PAYD Pro PlusTM provides you with the ability to communicate with your customers via mass emailing.
NOTE: The Mass Mailing feature is optional and may or may not be visible based on your Merchant Agreement with Moneris®.
NOTE: The Mass Mailing feature can send a maximum of 1000 emails in a single batch.
To send out a mass email to your customers, follow these general steps:
View the results of the mass email.
On the PAYD Administration main screen, click Profiles.
On the Profiles menu, under the Customers section, click Mass mailing.
The Mass Mailing wizard appears.
Fill out the fields in the 1. Edition tab following these guidelines:
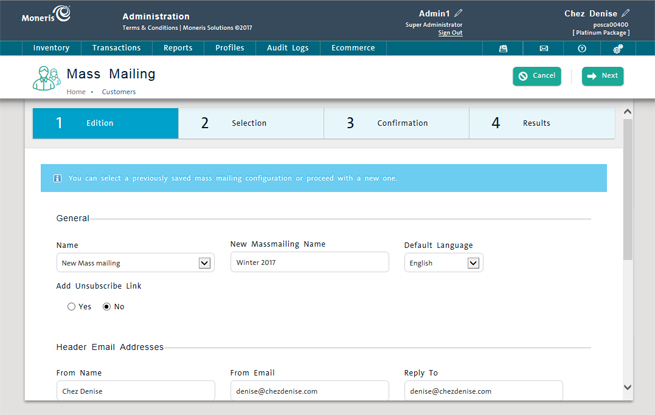
General section
New Massmailing Name - This field is a unique identifier for this particular mass email. The name is used internally by PAYD Pro Plus to identify the email - your recipients do not see it. The name you give to each email should be relevant to what the email is about and could include alphanumeric characters. For example, if this is an email to announce a new 20% promotion for summer of 2015, you might name it Summer2015Promo.
Default Language - This drop-down menu enables you to select the language of the email.
Select English to have the email go out in English only (based on text entered into the English Subject and Body fields below), regardless of the Language of Correspondence assigned to the customer in their Customer Details tab.
Select French to have the email go out in French only (based on text entered into the French Subject and Body fields below), regardless of the Language of Correspondence assigned to the customer in their Customer Details tab.
Select None to have the system respect the Language of Correspondence assigned to the customer in their Customer Details tab. Customers with English specified in their profile will receive the English Subject and Body; customers with French specified in their profile will receive the French Subject and Body
NOTE: If you pick None and you have only English content (Subject and Body), customers with French selected as their Language of Correspondence will not receive the email and vice-versa.
Add Unsubscribe Link - To add an unsubscribe link to the bottom of your emails, select Yes, otherwise leave it set to No.
Header Email Addresses section
From Name - This is the sender's name that will appear. Please ensure it is spelled correctly, and try to avoid using employee's actual names. Instead use the business' name.
From Email - This is the sender's email field that the recipient will see as having sent the email. For example, your business might want to use a general inbox like an [email protected] or [email protected]. Please ensure the email address entered is valid (spelled correctly) and active to ensure proper functionality of the mass email.
WARNING: Moneris does not recommend using your own personal email address for mass mailing purposes. Please use a business address for all mass emails.
Reply To - This is the email address that a recipient can reply to if they have questions or concerns. It can be different from the From email address, or it could be the same.
Subject section
English/French - This is the subject line for the email in English or French. The Subject explains to the recipient what the email is about. For example, if the email is announcing a new 20% off promotion for summer of 2015, you might put the subject as, "Summer 2015 Sale - 20% off!"
NOTE: Recipients will see the subject in their inboxes first, so please ensure it is spelled correctly and relevant to the communication. Taking care will make your communication more likely to make it through email spam filters, and more importantly, be read by the recipient.
In the Mass mailing screen, click inside the New Massmailing Name field and enter a unique name.
In the Header Email Addresses section, click inside the From Name/Email fields and enter in the email address that will be the sender.
Click inside the Reply To field and enter an email address that recipients can reply to if necessary.
In the Subject section, click inside the English field and type in a subject line for the email. The French field is optional.
It is possible to draft the email in two ways: Paste in content from an existing document outside of PAYD Pro Plus, or use the HTML Text Editor to author your own content.
In the Body section, click inside the English field.
Right-click and choose Paste from the menu.
The text you copied from the other document will be pasted into the field.
NOTE: You can only paste text into this field. If your document contains images or other elements, you will need to use the HTML Text Editor.
Edit the information using the HTML Text Editor as necessary.
Once you are finished drafting the email, click the Next button at the top of the screen.
The 2 Selection screen will appear, enabling you to select recipients from your customer list.
The HTML Text Editor enables you to author professional emails using powerful word processing tools. You can type text, or edit text that was pasted by highlighting it and using the formatting buttons. Refer to the Using the HTML Text Editor topic for more information on using this tool to produce email content.
In the Body section, click inside the English field.
A blank HTML Text Editor screen appears.
Type your message into the editor and apply font effects, embed hyperlinks and organize the email to look the way you want it to look.
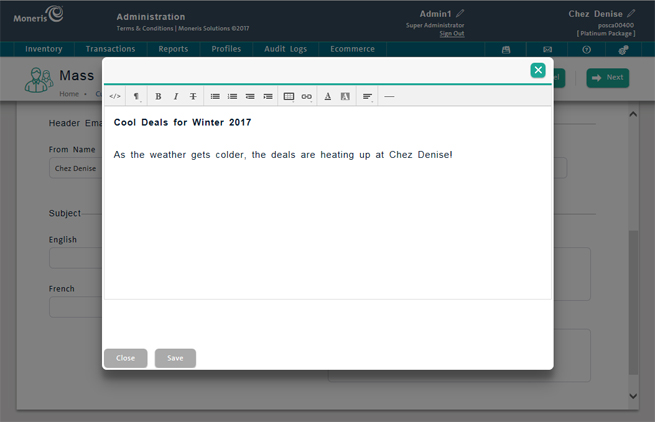
Click the Save button at the bottom of the screen when finished.
The HTML Text Editor screen closes.

Click the Next button at the top of the Mass mailing screen.
The 2 Selection screen will appear, enabling you to select recipients from your customer list.
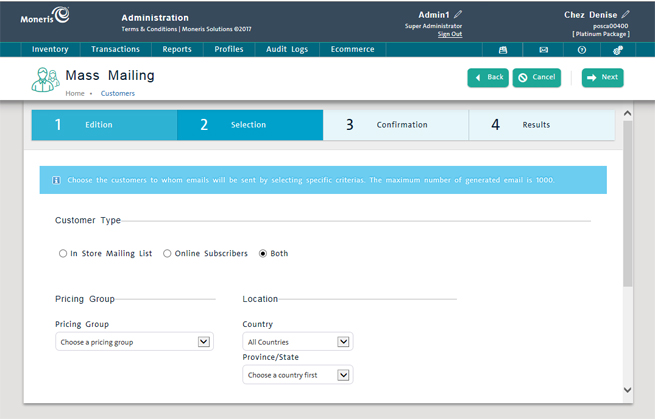
The next phase of sending out an email blast is to select the recipients for the email. Use a combination of the Customer Type, Pricing Group. Location and Date sections in the 2 Selection screen to narrow the search results to target a specific group of people, or use only one or none of these constraints if you want a larger pool of recipients.
Select the recipients following these guidelines:
Customer Type section
In Store Mailing List - This option will target customers who have provided a valid email addresses to you when they were registered, or when they have been subsequently edited.
Online Subscribers - This option will target customers who have registered online.
Both - This option will target customers who are part of the in store mailing list and the online subscribers.
NOTE: This Customer Type setting may or may not be visible based on your Merchant Agreement with Moneris.
Pricing Group section
Pricing Group - This option will target customers who belong to a particular pricing group and have a valid email address in their profile. It is possible to assign a customer to a pricing group in the Details tab of their profile. Refer to Editing Customer Details for more information.
Location section
Country - This will target customers who live in a particular country who have a valid email address in their profile.
Province/State - This will target customers who live in a particular province or state who have a valid email address in their profile.
Date section
Registration date range - This will target customers who were registered within a specified date range and have a valid email address in their profile. Refer to Registering a New Customer for more information.
Last modification date range - This will target customers with a valid email address who have been registered or have had their profile edited within a specified date range.
Click the Both radio button in the Customer Type section.
Click the Next button at the top of the screen without choosing any other criteria.
The 3 Confirmation screen will appear, enabling you to confirm the contents of the email and the list of recipients.
Click on the In Store Mailing List, Online Subscribers or the Both radio button to choose the type of customer you wish to target with this mass email.
Click the Next button at the top of the screen without choosing any other criteria.
The 3 Confirmation screen will appear, enabling you to confirm the contents of the email and the list of recipients.
Click the Pricing Group drop-down menu and select the pricing group from the list.
Click the Next button at the top of the screen without choosing any other criteria.
The 3 Confirmation screen will appear, enabling you to confirm the contents of the email and the list of recipients.
Click the Country drop-down menu and select the country from the list.
Click the Province/State drop-down menu and select the province or state from the list.
Click the Next button at the top of the screen without choosing any other criteria.
The 3 Confirmation screen will appear, enabling you to confirm the contents of the email and the list of recipients.
Place a checkmark in the Registration Date Range checkbox.
Click inside the Starting Date field and type in a start date (in MM/DD/YYYY format) OR use the Calendar and select a date.
Click inside the Ending Date field and type in a end date (in MM/DD/YYYY format) OR use the Calendar and select a date.
Click the Next button at the top of the screen without choosing any other criteria.
The 3 Confirmation screen will appear, enabling you to confirm the contents of the email and the list of recipients.
Place a checkmark in the Last Modification Date Range checkbox.
Click inside the Starting Date field and type in a start date (in MM/DD/YYYY format) OR use the Calendar and select a date.
Click inside the Ending Date field and type in a end date (in MM/DD/YYYY format) OR use the Calendar and select a date.
Click the Next button at the top of the screen without choosing any other criteria.
The 3 Confirmation screen will appear, enabling you to confirm the contents of the email and the list of recipients.
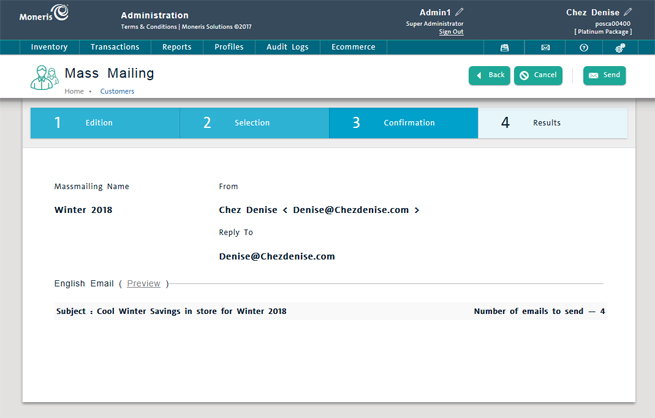
Once you have defined and drafted the email and selected the recipients, the 3 Confiirmation screen enables you to verify the addresses, the quantity of emails, the subject line and to get a preview of what the email will look like to the recipient. It also shows you the number of emails it is going to send (in the Number of emails to send caption).
You need to redefine the email. Click the Back button on the bottom of the screen twice to go to the 1 Edition screen.
Click the Preview link.
The email will appear in a separate popup.

Click the Close button when finished viewing.
You need to edit the email in the HTML Text Editor. Click the Back button twice to go to the 1 Edition screen.
You need to narrow or widen your search results. Click the Back button once to go to the 2 Selection screen.
Click the Send button at the top of the screen.
The 4 Results screen appears.
After you have sent the email, the 4 Results screen appears. The progress indicator in the middle of the screen shows the progress of the mass email job.
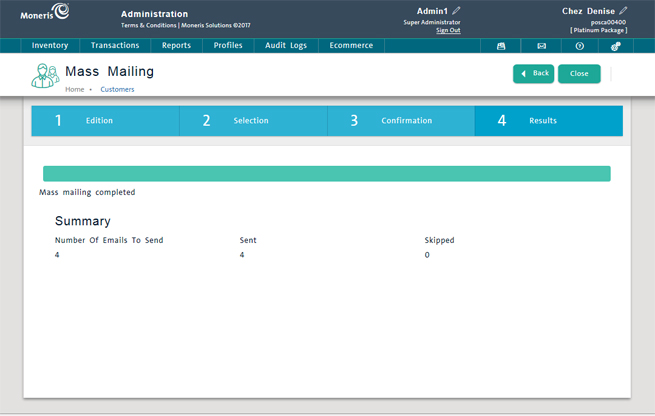
The Summary below shows the following:
Number Of Emails To Send - This value represents the number of emails contained in this particular batch.
Sent - This value represents the number of emails that were actually sent from the system to recipients.
Skipped - This value represents the number of recipients that were skipped (either because their email was invalid or because their spam filter blocked your email or for some other reason).
For example, if a mass email has 32 potential recipients and 12 were not delivered, the Summary would show: Number Of Emails So Send = 32, Sent = 20, Skipped =12.
Click the Close button on the bottom of the screen.