 key to select Add device.
Follow the steps below to pair the e355 via Bluetooth.
Important! Before you begin this setup procedure, ensure that the PAYD Pro Plus App is closed so that it is not running in the background on your Apple iPad.
Power on the e355:
a. Plug the small end of the USB charging cable into the micro-USB port on the e355.
Important! Use the USB charging cable provided with the e355. Failure to do so may affect the operability of, or cause damage to, the e355.
b. Plug the other end of the USB charging cable into a powered USB port (e.g., on a laptop or computer).
NOTE: Leave the USB charging cable connected to the e355 for the remainder of the setup process.
c. Wait while the e355 powers on.
d. When the “LANGUAGE/LANGUE” screen appears, proceed to step 2.
2. Ready your Apple iPad for Bluetooth pairing:
a. Power on your Apple iPad to which you want to pair the e355.
b. Ensure that Bluetooth is turned on, that the iPad is discoverable, and its Bluetooth settings screen is displayed.
NOTE: If the Apple iPad has ever been paired with a different e355 or another type of PIN Pad (e.g., a PAYD PIN Pad), ensure that the iPad does not continue to retain the other PIN Pad’s terminal ID in its Bluetooth memory (i.e., if necessary, un-pair the other PIN Pad from the Apple iPad so that it forgets the terminal ID). Refer to Unpairing the e355 PIN Pad for more information.
c. Place the Apple iPad beside the e355 with which you want to pair.
3. Configure the e355 for Bluetooth communication:
a. On the “LANGUAGE/LANGUE” screen, press the 1 key to select ENGLISH.
b. When the “TERMINAL SETUP” screen appears, press the 1 key to select Communication.
c. When the “COMMUNICATION” screen appears, press the 1 key to select PAYD Family.
d. When the “ECR CONNECTION” screen appears, press the 2 key to select Bluetooth.
e. When the “ECR OS” screen appears, press the 1 key to select iOS.
f. When the “Bluetooth” screen appears, proceed to step 4.
4. Pair the e355 with your Apple iPad via Bluetooth:
a. On the Bluetooth screen, press the green key to select Add device.
b. Wait while the e355 searches for devices with which to pair.
c. When the “Add device” screen displays, scroll to your iPad name, and press the green key to select it.
NOTE: To scroll up, press the 2 key; to scroll down, press the 5 key. If your iPad name is not listed, press the yellow  key, and return to step 4a.
d. When the “Pair device” screen appears, press the 3 key to select Yes.
e. When the “Pairing” screen displays, wait while the passkey is generated.
f. When the “Please compare” screen appears, note the six-digit passkey.
g. On your Apple iPad, wait for the “Bluetooth pairing request” popup to appear. This popup will include a six-digit passkey/code.
h. Compare the passkey displayed on the e355 and the passkey on the Apple iPad.
• If the passkeys are identical, go to the next step.
• If the passkeys are different, power off the e355 PIN Pad (press and hold down the red  key until it powers down), power it back up and repeat steps 3 and 4.
i. Tap Pair on the Apple iPad’s “Bluetooth Pairing Request” popup. On the e355, press the 3 key to select Yes.
j. When the “Paired” screen appears, press the green key to select OK.
k. When the “REBOOT TERMINAL” screen displays, wait while the e355 reboots.
l. Wait while the e355 re-establishes its Bluetooth connection with the iPad (during this period, the ‘WELCOME/BONJOUR NOT CONNECTED” screen displays).
m. Proceed to step 5.
5. Confirm that your Apple iPad is successfully paired with the e355:
a. When the “CONNECTED TO BT <your iPad name>” screen displays, it means the e355 has successfully established a Bluetooth connection with your Apple iPad.
NOTE: As long as the e355 can detect the Apple iPad, the iPad’s name will display at five-second intervals at the top centre of the e355 screen (otherwise the e355’s internal clock time will display). The clock time will be synchronized to the correct time when you initialize the e355.
b. When the “WELCOME/BONJOUR” screen appears, proceed to the next step.
c. On your Apple iPad’s Bluetooth settings screen, locate the e355's 8-digit terminal ID, which displays with the prefix "e355-" as in "e355-E1012345" (or sometimes the terminal ID may display simply as "Verifone BTx Host").
NOTE: The e355's terminal ID (e.g., "E1012345") is also printed on a label affixed to the underside of the e355.
d. On your Apple iPad’s Bluetooth settings screen, confirm that the terminal ID (or "Verifone BTx Host") is shown as a "Connected" device.
6. Log in to the PAYD Pro Plus App using your PAYD login credentials (Username, Password and Store ID), your Quick PIN, or your fingerprint (using Touch ID).
7. Tap the Settings button (![]() ).
).
8. On the main menu, tap Configuration.
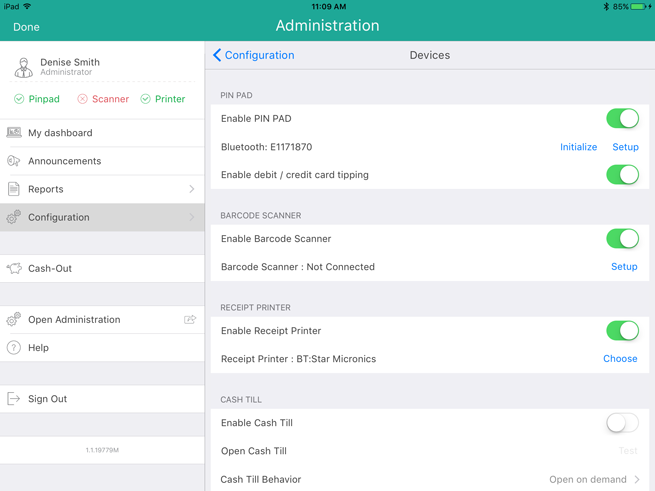
9. On the Configuration screen, tap Devices.
10. On the Devices screen, in the PIN PAD section, toggle the Enable PIN Pad switch to the right (Enabled).
11. Tap Setup.
12. In the PIN Pad Configuration popup, in the CONNECTION TYPE section, tap Bluetooth.
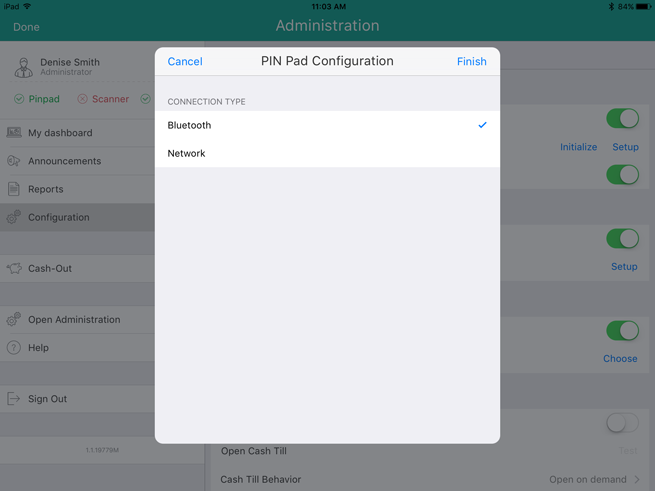
13. Tap Finish at the top of the PIN Pad Configuration popup.
“Connecting to PIN Pad” appears on the screen, then the Configuration – Devices screen appears.
Do one of the following:
• To enable tip prompts to be displayed on the PIN Pad when customers use Interac debit and credit cards, toggle the Enable debit/credit card tipping switch to the right (Default = Disabled).
• To not display tipping prompts, leave the Enable debit/credit card tipping switch toggled to the left (Disabled).
Proceed to Initialising the e355 PIN Pad in the Mobile App.
Follow the steps below to pair the e355 via Wi-Fi.
Important! Before you begin this setup procedure, ensure that the PAYD Pro Plus App is closed so that it is not running in the background on your Apple iPad.
Power on the e355:
a. Plug the small end of the USB charging cable into the micro-USB port on the e355.
Important! Use the USB charging cable provided with the e355. Failure to do so may affect the operability of, or cause damage to, the e355.
b. Plug the other end of the USB charging cable into a powered USB port (e.g., on a laptop or computer).
NOTE: Leave the USB charging cable connected to the e355 for the remainder of the setup process.
c. Wait while the e355 powers on.
d. When the “LANGUAGE/LANGUE” screen appears, proceed to step 2.
Ready your Apple iPad for Wi-Fi pairing:
a. Power on your Apple iPad to which you want to pair the e355.
b. Determine which is the network that you want to use to pair the e355 with the Apple iPad:
· If you want the Apple iPad to connect an external Wi-Fi network, configure the iPad to connect to the network.
NOTE: In the upcoming steps, you will be instructed to configure the e355 to connect to the same Wi-Fi network as the mobile device.
Important! Do not attempt to configure the e355 to connect to a public Wi-Fi network.
· If you want the e355 to connect to the Apple iPad’s personal Wi-Fi hotspot, generate the hotspot from the iPad now.
c. Place the Apple iPad beside the e355 with which you want to pair.
d. Proceed to step 3.
Configure the e355 for Wi-Fi communication:
a. On the “LANGUAGE/LANGUE” screen, press the 1 key to select ENGLISH.
b. When the “TERMINAL SETUP” screen appears, press the 1 key to select Communication.
c. When the “COMMUNICATION” screen appears, press the 1 key to select PAYD Family.
d. When the “ECR CONNECTION” screen appears, press the 1 key to select WiFi.
e. When the “WiFi” screen displays, create a profile for the Wi-Fi network to which you want the e355 to connect:
· To manually enter the Wi-Fi network name (SSID), proceed to step 4.
· To scan for the Wi-Fi network name (SSID), proceed to step 5.
NOTE: Use the scan option only if you are certain that the desired Wi-Fi network is broadcasting its SSID.
Manually enter the Wi-Fi network name (SSID):
a. On the “WiFi” screen, press the 1 key to select New.
NOTE: If you have already configured a Wi-Fi network profile, it will be listed on this screen.
b. When the “View/Edit” screen appears, press the green key to select SSID.
c. When the “SSID” screen displays, enter the name/SSID of the Wi-Fi network to which you want the e355 to connect, and press the green key.
NOTE: This parameter is case-sensitive. To enter the small/capital letters and special symbols, see Entering numbers, letters, and special characters.
d. When the “View/Edit” screen appears, press the 5 key to scroll to Wi-Fi Password and press the green key.
e. When the “WiFi Password” screen displays, enter the password of the Wi-Fi network to which you want the e355 to connect, and press the key.
NOTE: This parameter is case-sensitive. To enter the small/capital letters and special symbols, see Entering numbers, letters, and special characters.
f. When the “View/Edit” screen appears, press the 3 key to select Save.
g. When the “Configure Interface” screen appears, wait while the e355 applies the network settings.
h. When the “Accepted” screen appears, press the green key.
i. Wait while the e355 establishes its connection to the Wi-Fi network (during this period, the "WELCOME/BONJOUR NOT CONNECTED" screen displays).
The “CONNECTED TO WI-FI <Your Wi-Fi network SSID>” screen appears, displaying your network SSID and the e355’s IP address.
j. When the “WELCOME/BONJOUR” screen appears, proceed to step 6.
Scan for the SSID:
a. On the “WiFi” screen, press the 3 key to select WiFi Scan.
b. When the “WiFi Scan” screen displays, wait while the e355 scans for available Wi-Fi networks.
c. When the list of available Wi-Fi networks displays, scroll to the Wi-Fi network to which you want the e355 to connect, and press the green key to select it.
NOTE: To scroll up, press the 2 key; to scroll down, press the 5 key. If your Wi-Fi network is not listed, press the yellow key, and return to step 5a of this procedure.
d. When the next screen displays your Wi-Fi network profile settings, press the 3 key to select Add.
e. When the “Wi-Fi Password” screen appears, enter the password for your Wi-Fi network and press the green key.
NOTE: This parameter is case-sensitive. To enter the small/capital letters and special symbols, see Entering numbers, letters, and special characters.
f. When the “Configure Interface” screen appears, wait while the e355 applies the network settings.
g. When the “Accepted” screen appears, press the green key.
NOTE: If the “Internal error” screen appears, press the green key and go back to step 5a of this procedure.
h. Wait while the e355 establishes its connection to the Wi-Fi network (during this period, the "WELCOME/BONJOUR NOT CONNECTED" screen displays).
The “CONNECTED TO WI-FI <Your Wi-Fi network SSID>” screen appears, displaying your network SSID and the e355’s IP address.
i. When the “WELCOME/BONJOUR” screen appears, proceed to step 6.
On the “WELCOME/BONJOUR” screen, confirm that the Wi-Fi icon ( ) is displayed in the upper left corner of the screen, and your Wi-Fi network SSID is displayed at the top centre of the screen.
NOTE: As long as the e355 can connect to the Wi-Fi network, the network SSID will display at five-second intervals at the top centre of the e355 screen (otherwise the e355’s internal clock time will display). The clock time will be synchronized to the correct time when you initialize the e355.
Log in to the PAYD Pro Plus App using your PAYD login credentials (Username, Password and Store ID), your Quick PIN, or your fingerprint (using Touch ID).
Tap the Settings button (![]() ).
).
On the main menu, tap Configuration.
On the Configuration screen, tap Devices.
On the Devices screen, in the PIN PAD section, toggle the Enable PIN Pad switch to the right (Enabled).
Tap Setup.
In the PIN Pad Configuration popup, in the CONNECTION TYPE section, select Network.
In the NETWORK ADDRESS section, tap Search.
The PIN Pad Search popup appears.
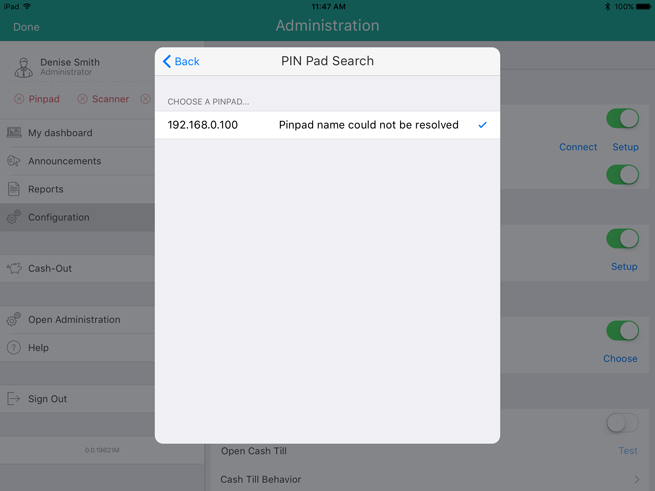
NOTE: It is possible to also manually enter a network (IP) address. Refer to Manually entering an IP address for the e355 PIN Pad for information on performing this task.
In the PIN Pad Search popup, tap the IP address of the e355 you paired with the iPad, then tap <Back at the top of the popup.
The PIN Pad Configuration popup appears with the IP Address fields populated.
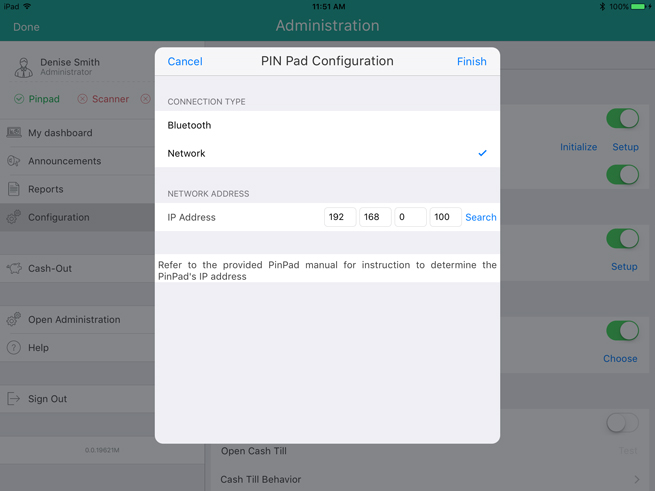
Tap Finish at the top of the PIN Pad Configuration popup.
The screen displays “Connecting to PIN Pad”, then the Configuration – Devices screen reappears.
Do one of the following:
● To enable tip prompts to be displayed on the PIN Pad when customers use Interac debit and credit cards, toggle the Enable debit/credit card tipping switch to the right (Default = Disabled).
● To not display tipping prompts, leave the Enable debit/credit card tipping switch toggled to the left (Disabled).
Proceed to Initializing the e355 PIN Pad.