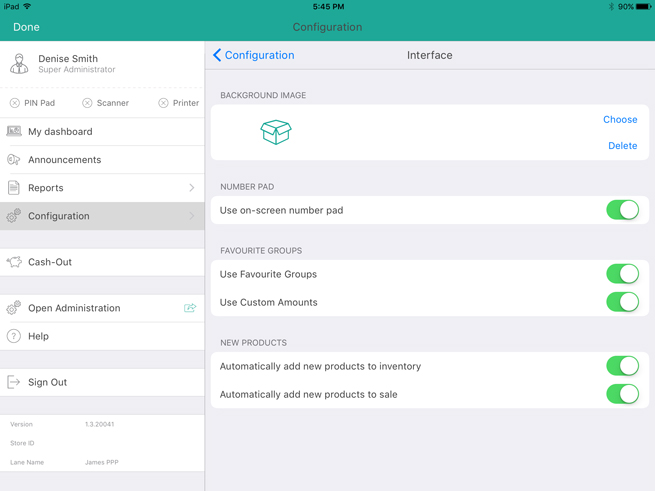
Use the Interface screen to select your logo and configure other display settings on PAYD Pro Plus. Your logo will appear as a background image on the left pane when this pane is not actively engaged in displaying information (i.e. transactional information during a sale). It is not necessary to display your logo, but it can help to improve customer perception of your business if you have it where they can see it.

Tap the Settings button (![]() ).
).
On the main menu, tap Configuration.
In the Configuration screen, tap Interface.
The interface settings screen opens on the right pane.
Select the image file to display as your background image.
NOTE: If you do not wish to display a background image, proceed directly to step 5.
In the BACKGROUND LOGO section on the right pane, tap Choose.
A popup appears.
Select the source for your image:
To take a picture with the iPad’s camera:
Tap Camera.
Take the picture with the camera.
If you are satisfied with the image, tap Use Photo. Proceed to step 5. If you are unsatisfied, tap Retake and repeat step ii.
To use an image stored on the iPad’s internal memory:
Tap Library.
The Photos popup appears.
Tap Camera Roll.
Browse the photos stored on your Apple iPad for your logo, and then tap it to select it.
Proceed to step 5.
Set the Number Pad settings:
To enable the PAYD Pro Plus Mobile App's on-screen number pad, toggle the Use on-screen number pad switch to the right. This number pad appears when processing transactions, enabling you to quickly key in numbers. By default, this switch is toggled to the right (Enabled).
To disable this feature, toggle it to the left.
NOTE: If this feature is disabled, the PAYD Pro Plus Mobile App will utilize the Apple iPad’s own alphanumeric number pad/keyboard for data entry.
Set the Favourite Groups settings:
To enable the Favourite Groups feature, toggle the Use favourite groups switch to the right. The Favourite Groups appears on the right pane when selecting inventory to add to a transaction. By default, this switch is toggled to the right (Enabled).
To disable this feature, toggle the switch to the left. When processing a transaction, a breakdown of totals and taxes will appear on the right pane.
To enable the Custom Amounts function, toggle the Use Custom Amounts tab switch to the left. The Custom Amounts tab appears as a tab at the bottom right corner of the Favourites Group. By default, this switch is toggled to the right (Enabled).
Set how the system deals with items that are currently not defined in inventory (in the NEW PRODUCTS section).
To have new (undefined) items that are scanned/entered during a sale added to your inventory after the sale, toggle the Automatically Add New Products to Inventory switch to the right. (Default = Disabled).
To have the new (undefined) item that is scanned/entered automatically added to the sale cart, toggle the Automatically Add New Products to Sale switch to the right. (Default = Disabled).
Tap < Configuration at the top of the right pane to save your work and return to the main Configuration screen.
The PAYD Pro Plus App supports enlarged text and bold font selections that users can make within the Apple iPad's Settings screen. If a user has enabled the following items within the Settings - Accessibility screen, the display in the PAYD Pro Plus App adjusts accordingly:
● Larger Text - Enable Larger Accessibility Sizes and drag the slider to set the font size you wish to use within the PAYD Pro Plus App and the iPad overall.
● Bold Text - Enable this function to add bolding to the text.
Consult the Apple iPad's documentation for instructions on changing these settings.