Use the PAYD Administration's customer import wizard to add new customers to your customer database and update details of existing customers. You access the wizard from the Relations menu.
NOTE: Based on your PAYD account type, you may encounter a limit to the number of customer profiles that can be imported into the customer database. Once the limit is reached, you will not be able to save additional customer profiles unless previously created profiles are removed from the database to create space for new ones. For more information on increasing this limit, please visit us at getpayd.com/paydproplus or call us at 1-855-423-PAYD (7293) to upgrade today.
Importing customer data is as easy as 1, 2, 3:
3. Troubleshoot (if necessary)
NOTE: All completed customer imports are logged in the Customer Imports Log.
To import your customer data you must create an import file that meets the following requirements:
PAYD Pro Plus does not support files saved as xlsx (Excel). If importing inventory from an Excel spreadsheet, the file must be saved as an Excel 2003 format (*.xls). OR The file must be a text file containing one customer record per line (row). Field (column) values in each row must be separated by commas (,) and enclosed in quotation marks ("). If your import file is not a text file, your data may be imported incorrectly.
The first row in the file does not need to contain field names. If your file does contain a first row with field names, make sure to indicate this during the import.
The file must contain the following fields:
Customer ID - An alphanumeric unique value identifying the customer. If you are adding a new customer, you must provide a unique ID. A missing or blank field will produce an error. If you are updating an existing customer's data, the field must contain the exact Customer ID.
First Name - The customer's first name.
Last Name - The customer's last name.
Primary Phone Number - The customer's primary phone number. Valid formats are xxxxxxxxxx, xxx-xxx-xxxx, xxx xxx xxxx.
NOTE: For detailed help on the format of the customer import file, see Creating the Customer Import File - Details.
Once you have created your import file, you are ready to import the customer data. If you need to make changes during the import, click the Back button at the top of the wizard screen. You can also cancel the import at any time by clicking the Cancel button.
NOTE: You do not need to be logged in to PAYD Pro Plus while a customer import is in progress. Once you start an import, you can log out and PAYD Pro Plus will complete the import as usual. Once you log back in, you can view the results of the import in the Customer Imports Log.
TIP: You cannot use any other PAYD Pro Plus functionality while a customer import is in progress. It is therefore recommended that you import customer data during off hours.
On the PAYD Administration main screen, click Profiles.
On the Profiles menu, under the Customers heading, click Import.
The Customer Import wizard appears displaying the File Selection screen.
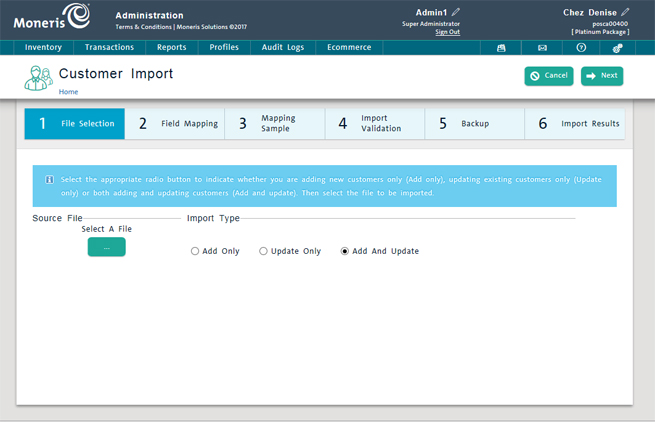
Under Source File, click the  (Select a File) button to select the customer data import file you created.
In the Choose file dialogue, find and select the file, and then click Open.
Under Import Type, select the appropriate radio button to indicate how you are importing customers:
To add new customers only, select Add Only.
To update existing customer profiles only, select Update Only.
To add new customers and update existing customer profiles, select Add And Update. The default is Add And Update.
NOTE: If you select Add Only, PAYD Pro Plus skips any records for existing customers. If you select Update Only, PAYD Pro Plus skips any new customer records.
NOTE: To change the selected file, click the Delete button![]() next to the file name and select the new file as above.
next to the file name and select the new file as above.
Click the Next button at the top of the screen.
The Field Mapping screen appears.
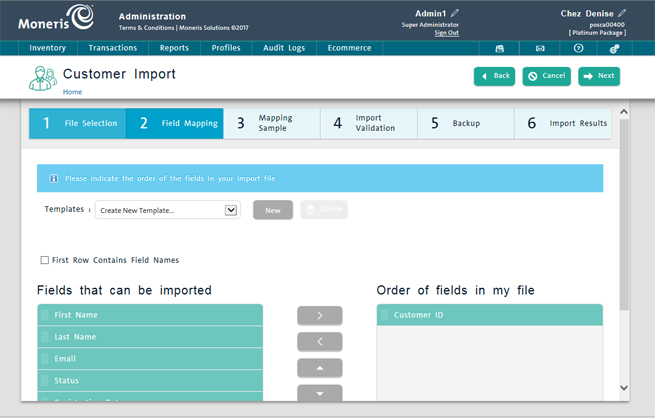
If the first row in the import file contains field names, place a checkmark in the First Row Contains Field Names checkbox.
NOTE: If the first row in the file does contain field names and you do not select the checkbox, PAYD Pro Plus will attempt to import the first row as a customer record, which will produce errors upon validation. Conversely, if the first row in the file does not contain field names and you do select the checkbox, the import will skip the first record (row) in the file.
Click and drag fields from the Fields that can be imported box to the Order of the fields in my file box. Select only those fields that are in the import file and make sure to order the fields following the order in the import file. To remove a field from the Order of the fields in my file box, click and drag it back to the Fields that can imported box.
NOTE: Mapping the fields incorrectly will produce an error and you will not be able to proceed with the import. If the field mapping order is not correct, the data will be imported correctly.
TIP: To select all the fields, click the Select All button.![]() To remove all the fields from the Order of the fields in my file box, click the Remove All button.
To remove all the fields from the Order of the fields in my file box, click the Remove All button.![]()
To preview the imported data, click the Next button.
The Mapping Sample screen appears.

Do one of the following:
If you are satisfied with the results of the mapping, go to step 2 below.
If results are incorrect, click the Back button to make the necessary corrections as above and repeat.
Click the Next button to confirm the mapping.
The Import Validation screen appears.

Review the results of the validation and do one of the following:
If the validation is successful (no errors), go to step 4 below.
If the validation produces any errors, go to Troubleshooting the Import below.
Click the Next button.
The Backup screen appears.
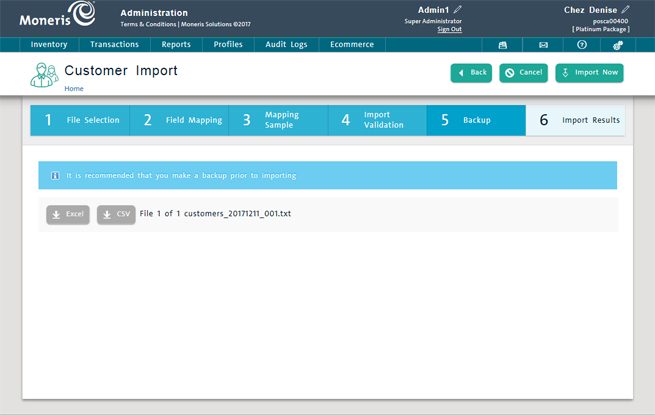
Choose your backup medium:
Click the Excel button to backup your customer database to an Excel spreadsheet.
OR
Click the CSV button to backup your customer database to a comma separated value text file.
A File Download dialogue appears at the bottom of the browser.
Click Save.
At the top of the wizard's Backup screen, click the Import Now button.
A bar on the screen shows you the progress of the import and the amount of time left to complete it.
NOTE: While the import is in progress, you cannot use any other PAYD Pro Plus functionality. However, you can cancel the import by clicking the Cancel button next to the progress bar.
Once the data is imported, the Import Results screen appears notifying you that the import is complete and displaying a summary of results.
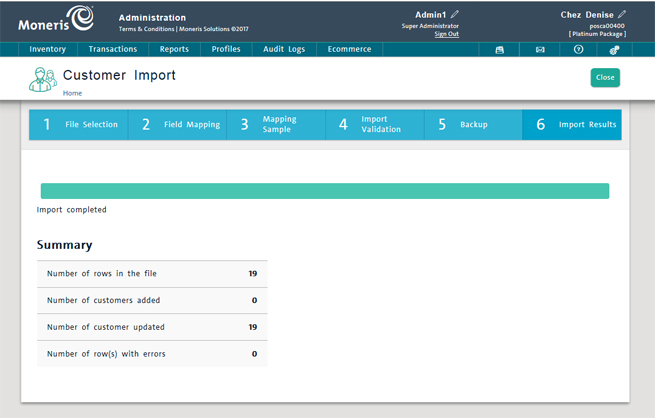
To exit the wizard and return to the Customer Search Results screen, click Close at the top of the screen.
NOTE: You can view the results of a completed import at any time through the Customer Imports Log.
If the validation of your imported customer data produces errors (see To confirm the mapping and validate the import above), you should troubleshoot the customer import file and make the necessary corrections. You can also choose to continue with the import regardless of errors.
The Customer Import wizard displays these errors and generates an Error Log for you to view and save.
On the wizard's Import Validation screen, click the Next button at the top of the screen and proceed with the import as normal.
NOTE: PAYD Pro Plus skips any rows with errors.
On the wizard's Import Validation screen, click the Save Error Log button.
A File Download dialogue appears.
Click the Open button.
The error log appears in your default text editor (e.g., Notepad).
Print or save the error log as needed and exit.
On the wizard's Import Validation screen, click the Cancel button at the top of the screen.
Make the necessary corrections to your customer import file following the guidelines above in this topic. For more detailed help, see Creating the Customer Import File.
Re-import the file following the guidelines above in this topic.
If your import seems stuck while in process, it is possible to abort the import by pressing the Cancel button at the bottom of the screen at any time. A warning message appears to notify you to check your customer database prior to beginning another import. It is possible that the import may have completed while the screen was frozen.