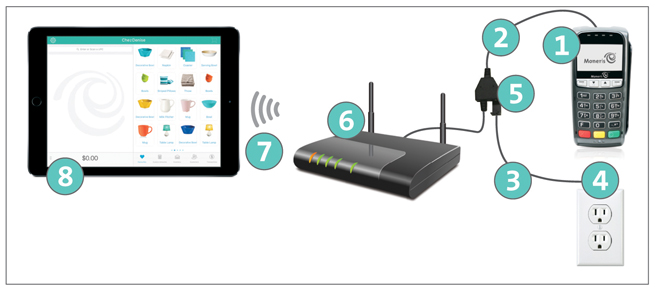
Refer to the diagram below to determine the proper order in which you connect the iPP320 PIN Pad to the router.
Turn the iPP320 PIN Pad ![]() over so that the back panel is facing you.
over so that the back panel is facing you.
Plug the HDMI connection of the PIN Pad cable ![]() into the HDMI port on the back of the iPP320 PIN Pad (raise the latch).
into the HDMI port on the back of the iPP320 PIN Pad (raise the latch).
Optional: Secure the PIN Pad cable to the iPP320 PIN Pad.
Lift the flap exposing the screw holes.
Use a Phillips screwdriver to tighten the screws onto the housing of the HDMI connection.
Fold the latch down and press to secure the cable.
Connect the other end of the PIN Pad cable to an available Ethernet port on the router ![]() .
.
Connect the power adaptor cable ![]() to the junction box
to the junction box ![]() on the PIN Pad cable.
on the PIN Pad cable.
Connect the other end of the power adaptor cable ![]() to a wall outlet or surge protector
to a wall outlet or surge protector ![]() .
.
The iPP320 PIN Pad boots up to the LANGUAGE/LANGUE screen.
You are now ready to configure the iPP320 PIN Pad’s options.