On the Sale screen, tap Inventory at the bottom of the right pane.
Tap the Add Product button ( ) at the top of the right pane.
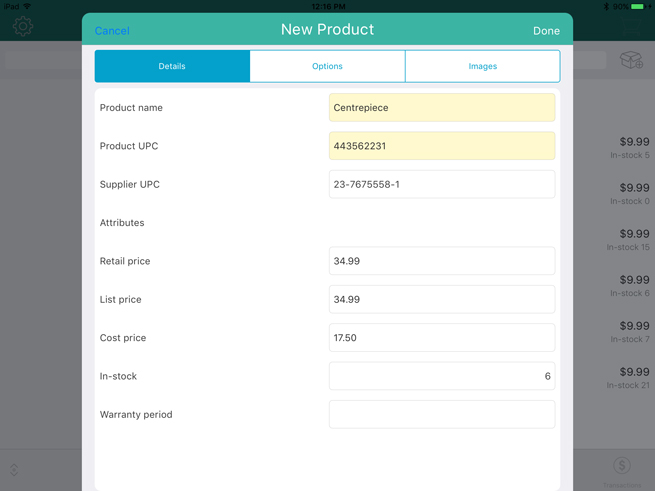
You can use the New Product popup to add products to the business’ inventory.
NOTE: Based on your PAYD account type, you may encounter a limit to the number of product profiles that can be added to the inventory database. Once the limit is reached, you will not be able to save additional product profiles unless previously created profiles are removed from the database to create space for new ones. For more information on increasing this limit, please call us at 1-855-423-PAYD (7293) to upgrade today.
NOTE: Fields highlighted in yellow are mandatory.
On the Sale screen, tap Inventory at the bottom of the right pane.
Tap the Add Product button () at the top of the right pane.
The New Product popup appears.
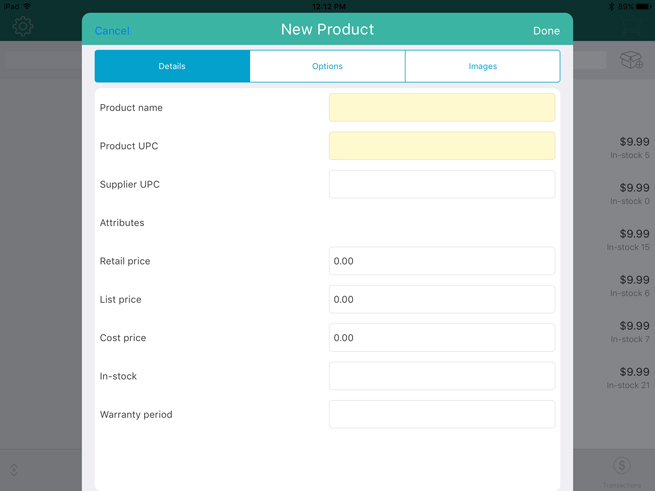
Enter the product's name into the Product name field.
Tap inside the Product UPC field and use the Bluetooth barcode scanner to scan the product's barcode.
OR
Tap inside the Product UPC field and use the on-screen keyboard to manually key in the digits from the product's barcode.
NOTE: If the product does not have a barcode, you may key in your own unique UPC code for this item.
Tap inside the Supplier UPC field and manually key in the supplier's PC code for the product.
Use the on-screen numberpad to enter prices for the product:
● Tap inside the Retail price field and enter the item's retail price in dollars and cents. Tap the checkmark ( ) when finished.
● Enter the item's list price in the List price field in dollars and cents. Tap the checkmark () when finished.
● Enter the item's unit cost (what you pay your supplier for the item) in dollars and cents into the Cost price field. Tap the checkmark () when finished.
In the In-stock field, enter the item's current on-hand value. Tap the checkmark () when finished.
If the item comes with a manufacturer's warranty, enter the item's warranty period in months into the Warranty period field. Tap the checkmark () when finished. If the item does not come with a warranty, skip this step.
Tap the Options tab at the top of the New Product popup.
If you have brand names defined, tap the Brand name drop-down arrow and select the brand to which this item belongs. If you do not have brands defined, skip this step.
Set the product options following the guidelines below:
● To make the product part of your inventory, toggle the Track this product's stock qty switch to the right (Default = Enabled).
● If you are recording this product's serial number at the time of purchase, toggle the Prompt for serial number when sold switch to the right (Default = Disabled).
● If the product will require any type of service by your business, toggle the This product requires service switch to the right (Default = Disabled).
● If a customer needs to be added to your customer database in order to purchase the product, toggle the Register customer required switch to the right (Default = Disabled).
● If the product is capable of being returned for a refund or exchange, toggle the This product is returnable switch to the right (Default = Enabled).
● If the product you are selling is a gift card, toggle the Is a gift card switch to the right (Default = Disabled).
● If an employee is able to earn commission when selling this product, toggle the Use commission switch to the right (Default = Disabled).
Do one of the following:
● If you wish to include an image of the product in its profile, proceed to step 13.
● If you do not wish to include an image, proceed to step 15.
Tap the Images tab at the top of the New Product popup.
If you wish to use the Apple iPad’s camera to take a picture of the product, or use an image stored on the iPad’s internal memory, follow the steps below.
Tap Select in the middle of the screen.
A popup appears.
Select the method by which you would like to add an image to the product profile:
To use an image that is already stored on the Apple iPad’s internal memory:
Tap Library.
NOTE: If prompted to allow the PAYD Pro Plus App to access your Apple iPad’s photo library, tap Yes.
Browse the images stored on the Apple iPad, and tap the image once you locate it. Proceed to step 15.
To take a picture of the product:
Tap Camera.
NOTE: If prompted to allow the PAYD Pro Plus App to access your Apple iPad’s camera, tap Yes.
Take the photo.
Tap Use Photo to use the image. Proceed to step 15.
OR
Tap Retake to retake the image. Repeat step ii.
Tap Done in the top right corner of the New Product popup.
An inventory screen appears in the right pane to provide you with the opportunity to edit the product profile.
Do one of the following:
● Edit the product profile.
● Tap <Back at the top of the right pane to save the product profile.
Repeat steps 2 – 16 to create other product profiles as necessary.
Adding a New Product (In-Store)