Importing Suppliers
Use the supplier import wizard to add new suppliers to your system, and update details of existing suppliers. You access the wizard from the Relations menu.
NOTE: Suppliers imported using the PAYD Pro PlusTM In-Store Solution are specific to that store. The suppliers that are imported using PAYD Pro Plus Multi Location Administration are available for all the stores in PAYD Pro Plus (multi-store environment only).
Importing suppliers is as easy as 1, 2, 3:
-
Create the import file
-
Import the data
-
Troubleshoot (if necessary)
Creating the Supplier Import File Overview
To import your suppliers, you must create an import file that meets the following requirements:
-
The file must be a text file containing one record per line (row). Field (column) values in each row must be separated by commas (,) and enclosed in quotation marks ("). If your import file is not a text file, your data may be imported incorrectly.
-
The first row in the file does not need to contain field names. If your file does contain a first row with field names, make sure to indicate this during the import (in the Field Mapping page).
-
The file must contain the Supplier ID field, a unique alphanumeric ID used to identify the supplier. If you are adding a new supplier, you must provide a unique ID. A missing or blank field will produce an error. If you are updating an existing supplier in PAYD Pro Plus, the Supplier ID field in the text file must contain the exact Supplier ID already stored within the PAYD Pro Plus In-Store Solution.
-
Save the text file on the hard drive of the computer where you will be accessing the PAYD Pro Plus In-Store Solution to import the file.
Importing the Supplier Data
Once you have created your import file, you are ready to import the supplier data. If you need to make changes during the import, click the Back button at the top of the wizard screen. You can also cancel the import at any time by clicking the Cancel button.
Importing suppliers is a process of 6 steps:
Selecting the Import File
Use the File selection screen to select the import file and define the type of import being performed.
To start the import and select the import file:
-
On the PAYD Administration main screen, click Profiles.
-
On the Profiles menu, under the Suppliers section, click Import.
The Supplier Import screen appears.

-
In the File Selection page, under the Source File heading, click the ellipsis button ( ) to browse for the location of the text (import) file.
The Choose File to Upload popup appears.
-
Browse for the text file containing your supplier info. Once you locate the file, click the Open button.
The Choose File to Upload popup closes and the Supplier Import screen reappears with the file.
-
Select the operation you are performing from the Import Type section:
-
To add new supplier files only, click Add Only.
-
To update your existing supplier profiles only, click Update Only.
-
To add new supplier files and update existing profiles, click Add And Update.
-
Click the Next button on the top of the screen.
-
Proceed to the instructions below for mapping the fields.
Mapping the Fields
Use the Field Mapping screen to match the fields in your text (import) file to the fields to make up a supplier's profile in PAYD Pro Plus.
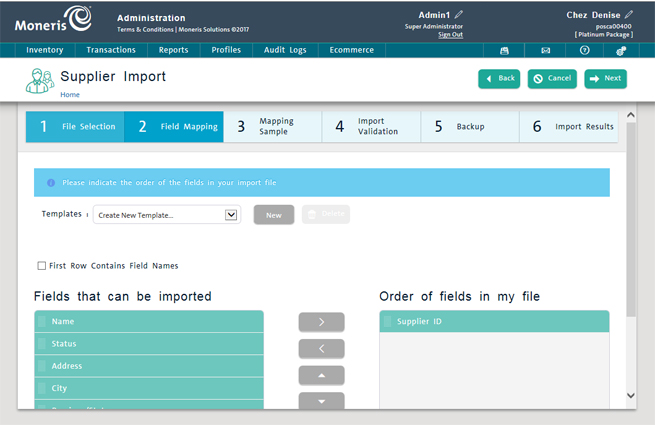
To map the fields of the import file to PAYD Pro Plus supplier fields:
-
If the first row in the import file contains field names, click to select the First Row Contains Field Names checkbox.
NOTE: If the first row in the file does contain field names and you do not select the checkbox, PAYD Pro Plus will attempt to import the first row as a product record, which will produce errors upon validation. Conversely, if the first row in the file does not contain field names and you do select the checkbox, the import will skip the first record (row) in the file.
-
Click and drag fields from the Fields that can be imported box to the Order of the fields in my file box. Select only those fields that are in the import file and make sure to order the fields following the order in the import file. To remove a field from the Order of the fields in my file box, click and drag it back to the Fields that can imported box.
NOTE: Mapping the fields incorrectly will produce an error and you will not be able to proceed with the import. If the field mapping order is not correct, the data will be imported correctly.
TIP: To select all the fields, click the Select All button. To remove all the fields from the Order of the fields in my file box, click the Remove All button.
 Use the Up and Down arrow buttons
  to reposition a field once it has been moved over to the Order of the fields in my file box.
-
Click the Next button on the top of the screen.
-
Proceed to the instructions below for previewing the mapping sample.
Viewing the Mapping Sample
Use the Mapping Sample screen to look at a sample of the data that will be imported from the text file based on the field mapping you did in the previous screen. If there are any problems with your mapping, this screen will show you so that you can make repairs before proceeding.
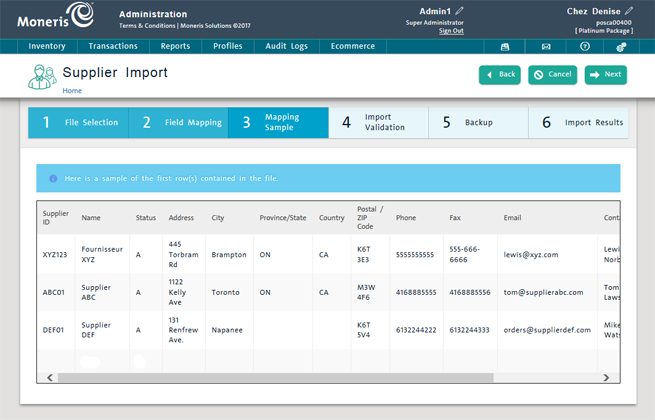
To view the mapping sample:
-
In the Mapping Sample screen, do one of the following:
-
If you are satisfied with the results of the mapping, go to step 2 below.
-
If results are incorrect, click the Back button to make the necessary corrections as above and repeat.
NOTE: You may also need to make adjustments to the text file i.e. a misplaced comma can result in two fields joined into one. If you need to fix the text file, do so and return to selecting the import file. See Troubleshooting the Import for more information.
-
Click the Next button at the top of the screen.
-
Proceed to the instructions below for validating the import.
Validating the Import
Use the Import Validation screen to ensure that the data you are importing is free of errors and that the import will do what you want it to do.
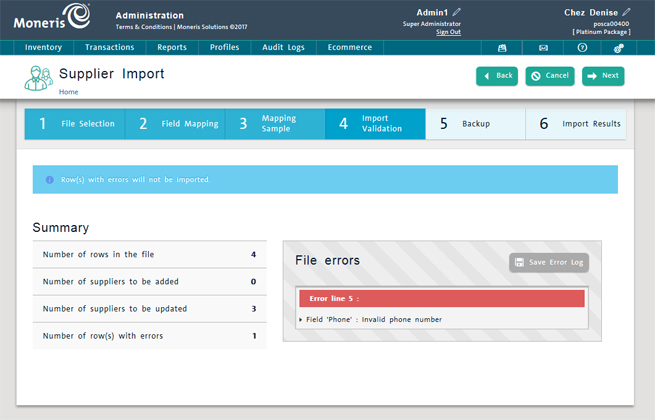
To view the import validation:
-
In the Import Validation screen, review the following information:
-
Summary - Ensure the data presented in here is accurate e.g. if your goal is to add suppliers only (this option is selected in the File Selection screen), you should see 0 beside "Number of suppliers to be updated".
-
File errors - Review any notes posted here as this will tell you what errors might be contained in the import text file, or with your file mapping. See Troubleshooting the Import for more information.
-
Take the following action:
-
If you are satisfied with the values in the Summary and File errors sections, click the Next button on top of the screen. Proceed to the Backup section below.
OR
-
If the Summary section is not correct, or if there are errors, click the Back button on top of the screen to go back to previous steps to fix mistakes.
Backing Up before Import
Before proceeding with the import, Moneris recommends performing a backup of your existing supplier data just in case a problem occurs. Use the Backup screen to perform the backup.
IMPORTANT: If you do not take a backup, and the import damages your supplier profiles in some way, there may be no way to restore your data back to the point before your import.

To backup your data:
-
In the Backup screen, select your backup method:
-
Click the Excel button to backup your suppliers to an Excel spreadsheet.
OR
-
Click the CSV button to backup your suppliers to a comma-separated text file.
NOTE: If a popup appears at the bottom of the screen asking what action you wish to take (Open, Save or Cancel), select Save and choose a location on your hard drive to save the backup file.
-
When the backup is complete, click the Import Now button on top of the screen.
-
Proceed to the Viewing Import Results section below.
Viewing Import Results
The Import Results screen displays the results of the import. While the import is in progress, a status bar displays the status of the import. Once complete, the summary shows the results of the import (including number of suppliers added and updated etc.)
When finished viewing the results, click the Close button on top of the screen.

Troubleshooting the Import
If the validation of your imported supplier data produces errors (see Validating the Import above), you should troubleshoot the import file and make the necessary corrections. You can also choose to continue with the import regardless of errors.
The Import wizard displays these errors and generates an Error Log for you to view and save.
To continue with the import regardless of errors:
NOTE: The system skips any rows with errors.
To correct file errors and re-do the import:
-
On the wizard's Import Validation screen, click the Save Error Log button.
-
Click the Open button.
-
Print or save the Error Log as needed and exit.
-
On the wizard's Import Validation screen, click the Cancel button at the top of the screen.
-
Make the necessary corrections to your inventory import file following the guidelines in this topic.
-
Re-import the file following the guidelines in this topic.
Cancelling an Import
If your import seems stuck while in process, it is possible to abort the import by pressing the Cancel button at the top of the screen at any time. A warning message appears to notify you to check your inventory database prior to beginning another import. It is possible that the import may have completed while the screen was frozen.
Related Topics
The Suppliers Search Results Screen
Searching Suppliers
Adding a New Supplier
Editing Supplier Details
Deleting a Supplier