On the PAYD Administration main screen, click the Configuration icon ( ).
).
Use the Receipt Options screen to configure receipt printing options.
On the PAYD Administration main screen, click the Configuration icon ().
The Configuration menu appears.
On the Configuration menu, click Receipt Options.
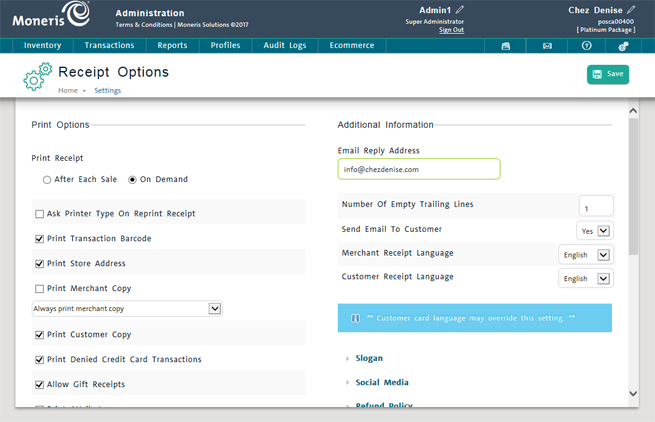
Under the Print Options section, select Print Receipt options as follows:
Select the appropriate radio button: After Each Sale or On Demand (the default is On demand).
To have the system prompt for printer type (i.e. receipt printer or document printer) when reprinting receipts, place a checkmark in the Ask Printer Type On Reprint Receipt checkbox, otherwise leave it blank.
To print transaction barcodes on receipts, place a checkmark in the Print Transaction Barcode checkbox, otherwise leave it blank.
To print your store address on receipts, place a checkmark in the Print Store Address checkbox, otherwise leave it blank. The address is drawn from what you enter in the Contact Information screen.
To print a merchant copy of receipts, place a checkmark in the Print Merchant Copy checkbox, otherwise leave it blank. If checked, choose one of the following print options from the drop-down menu:
Always print merchant copy - Selecting this option means the system will always print a merchant copy of the receipt.
Only when credit card used - Selecting this option means the system will only print a merchant copy of the receipt when a credit card is used as payment.
Only when credit or debit card used - Selecting this option means the system will only print a merchant copy of the receipt when a credit card or a debit card is used as payment.
Only if a signature is needed - Selecting this option means the system will only print a merchant copy if a customer's credit card is swiped. If the customer taps their credit card or inserts a chip, a signature line is not printed on receipts.
NOTE: This setting only applies to merchants who are using Moneris® as their integrated payment processor.
To print a customer copy of receipts, place a checkmark in the Print Customer Copy checkbox, otherwise leave it blank.
To print a declined receipt when a credit card transaction declines, place a checkmark in the Print Denied Credit Card Transactions checkbox, otherwise leave it blank.
To allow printing of gift receipts, place a checkmark in the Allow Gift Receipts checkbox, otherwise leave it blank.
To print product attributes on receipts, place a checkmark in the Print Attributes checkbox, otherwise leave it blank.
To print the cashier name on receipts, place a checkmark in the Print Cashier Name checkbox, otherwise leave it blank.
To print the customer's name on receipts, place a checkmark in the Print Customer Name checkbox, otherwise leave it blank.
To print the customer's contact information on receipts, place a checkmark in the Print Customer Contact info checkbox, otherwise leave it blank.
To enable a map to appear on emailed and texted receipts (from the PAYD Pro Plus Mobile App), place a checkmark in the Map on Receipts (Email And SMS Text Message Receipts Only) checkbox, otherwise leave it blank. NOTE: The map that appears on texted and emailed receipts is a map to your store location, and is based upon the business address entered into the Contact Information screen.
Click the Save button on top of the screen.
Under the Additional Information section, complete the fields as follows:
If emailing receipts to customers, enter the reply address into the Email Reply Address field.
Enter a numeric value into the Number of empty trailing lines field. These trailing lines are blank spaces at the bottom of the receipt.
To email receipts to customers at the time of sale, select Yes from the Send Email To Customer drop-down menu.
NOTE: If a customer has a valid email address entered in their customer profile (in the customer details tab) the receipt is sent to that address when this option is selected.
Select the preferred language for merchant receipts from the Merchant Receipt Language drop-down menu. The default is English.
Select the preferred language for customer receipts from the Customer Receipt Language drop-down menu. The default is English.
NOTE: The customer's card language setting (e.g. the language data contained on the card's chip or mag stripe) may override the language options selected here.
Configure the Slogan, Social Media, Refund Policy, Receipt Message, Gift Receipt Policy, Warranty Policy, Store Credit Policy, Layaway Policy, Invoice Policy, and Sale Quote Policy to print on the receipts as necessary (described below).
NOTE:These slogans, messages and policies are optional. Only enter the ones you want printed on each receipt, and leave the other ones blank.
Please note, the receipt settings that are being configured here also apply to the PAYD Pro Plus Mobile App. However, there are some application-specific settings that can be configured only within the PAYD Pro Plus Mobile Solution. Refer to Configuring Receipt Options for more information.
Click the Slogan button. The Slogan section expands, revealing two textboxes.
In the appropriate textbox (English or French), enter the store slogan you would like printed on receipts (max. 255 characters).
Click the Slogan button again to collapse the section, or click another button to configure additional text.
Click the Social Media button. The Social Media section expands, revealing two textboxes.
Click inside the Facebook field and enter your business' corporate Facebook page address.
Click inside the Twitter field and enter your business' corporate Twitter page address.
Click inside the Instagram field and enter your business' corporate Instagram page address.
Click the Social Media button again to collapse the section, or click another button to configure additional text.
NOTE: These social media links will print on printed copies of Customer receipts. The links will also appear on emailed receipts, or receipts that are sent via SMS text from the PAYD Pro Plus App.
Click the Refund Policy button. The Refund Policy section expands, revealing two textboxes.
In the appropriate textbox (English or French), enter the refund policy you would like printed on receipts (max. 255 characters).
Click the Refund Policy button again to collapse the section, or click another button to configure additional text.
Click the Receipt Message button. The Receipt Message section expands, revealing two textboxes.
In the appropriate textbox (English or French), enter the message you would like printed on receipts (max. 255 characters).
Click the Receipt Message button again to collapse the section, or click another button to configure additional text.
Click the Gift Receipt Policy button. The Gift Receipt Policy section expands, revealing two textboxes.
In the appropriate textbox (English or French), enter the policy you would like printed on gift receipts (max. 255 characters).
Click the Gift Receipt Policy button again to collapse the section, or click another button to configure additional text.
Click the Warranty Policy button. The Warranty Policy section expands, revealing two textboxes.
In the appropriate textbox (English or French), enter the warranty policy you would like printed on receipts (max. 255 characters).
Click the Warranty Policy button again to collapse the section, or click another button to configure additional text.
Click the Store Credit Policy button. The Store Credit Policy section expands, revealing two textboxes.
In the appropriate textbox (English or French), enter the warranty policy you would like printed on receipts (max. 255 characters).
Click the Store Credit Policy button again to collapse the section, or click another button to configure additional text.
Click the Layaway Policy button. The Layaway Policy section expands, revealing two textboxes.
In the appropriate textbox (English or French), enter the layaway policy you would like printed on receipts (max. 255 characters).
Click the Layaway Policy button again to collapse the section, or click another button to configure additional text.
NOTE: This will only be visible if you have enabled Use Layaways in the Configuration - Settings screen.
Click the Invoice Policy button. The Invoice Policy section expands, revealing two textboxes.
In the appropriate textbox (English or French), enter the invoice policy you would like printed on receipts (max. 255 characters).
Click the Invoice Policy button again to collapse the section, or click another button to configure additional text.
NOTE: This will only be visible if you have enabled Use Invoices in the Configuration - Settings screen.
Click the Sales Quotes Policy button. The Sales Quotes Policy section expands, revealing two textboxes.
In the appropriate textbox (English or French), enter the warranty policy you would like printed on receipts (max. 255 characters).
Click the Sales Quotes Policy button again to collapse the section, or click another button to configure additional text.
NOTE: This will only be visible if you have enabled Use Sales Quotes in the Configuration - Settings screen.
● Click the Save button at the top of the screen.