The PAYD Pro PlusTM Mobile Solution offers several of the same receipt settings that the PAYD Pro Plus In-Store Solution uses (see Configuring Merchant Receipt Options for more information). However, some of the Mobile App receipt settings are independent of the settings in the PAYD Pro Plus In-Store Solution.
Tap the Settings button (![]() ).
).
On the main menu, tap Configuration.
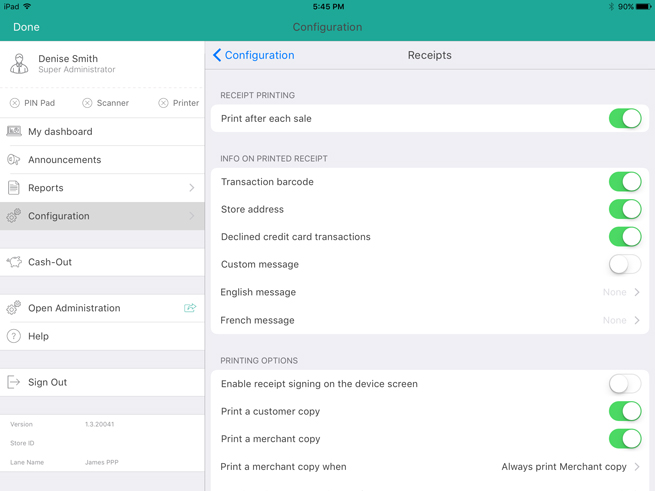
In the Configuration screen, tap Receipts.
Configure the receipt settings following the guidelines below:
RECEIPT PRINTING
NOTE: This setting is only applicable to merchants using a Bluetooth® receipt printer paired to an Apple iPad. If you do not have a Bluetooth receipt printer, you do not need to make any changes to this section.
Determine when you want the receipts to print:
To print a receipt automatically after each transaction completes, toggle the Print after each sale switch to the right (Enabled).
OR
To print a receipt on demand, toggle the Print after each sale switch to the left (Disabled).
INFO ON PRINTED RECEIPT
Determine what information gets printed on receipts:
To have a transaction barcode print on the receipts (to enable quick returns with a Bluetooth scanner), toggle the Transaction barcode switch to the right (Default = Enabled).
To have the business’ address print at the bottom of the receipt, toggle the Store address switch to the right (Default = Enabled).
To enable a printout of a credit card transaction that was declined, toggle the Declined credit card transactions switch to the right (Default = Disabled).
To print a custom (user-defined) message at the bottom of receipts, toggle the Custom message switch to the right (Default = Disabled).
If you enable the custom message, tap English message and in the screen that appears, use the on-screen keyboard to enter a message that will print at the bottom of receipts. Tap <Back when finished. The French message is optional, and will print only on transactions where a French-language card was used.
PRINTING OPTIONS
Determine what receipts are printed, and receipt languages:
If you do not have a Bluetooth receipt printer, toggle the Enable receipt signing on the device screen switchto the right (Default = Disabled). If you do have a Bluetooth receipt printer, leave this switch as Disabled. Enabling this feature allows the PAYD Pro Plus Mobile App to capture a customer’s signature on the screen when a transaction is paid by swiped credit card.
To print a customer copy, toggle the Print a customer copy switch to the right (Default = Enabled).
To print the merchant copy, toggle the Print a merchant copy switch to the right (Default = Enabled).
NOTE: This setting is dependent upon the Print a merchant copy when setting below.
To determine when a merchant copy will print, tap the Print a merchant copy when drop-down menu and tap your selection.
To set the default merchant language for your receipts, tap the Merchant language on the receipt, then tap your selection. Tap <Back when finished.
To set the default language for customer receipts, tap the Customer language on the receipt drop-down menu and tap your selection. This will be the default for all cash, cheque, gift card and non-integrated debit and credit transactions. Tap <Back when finished.
NOTE: For merchants using integrated payment processing with Moneris, this setting will be overridden at the time of the transaction based on the language code of the credit or debit card the customer used.
PAYMENT SCREEN SETTINGS
Use these options to select how the receipt can be provided to the customer.
To have the system prompt to print a paper receipt from a Bluetooth receipt printer, toggle the Enable print receipt button switch to the right (Default = Disabled).
To have the system prompt to send the receipt to the customer’s email address, toggle the Enable email receipt button switch to the right (Default = Enabled).
NOTE: If you want to e-mail transaction receipts without having to key in the address each time, configure your Apple® iPad's privacy settings to allow the PAYD Pro Plus app to access e-mail addresses stored on the device's contacts list.
To have the system prompt to send the receipt via SMS text message, toggle the Enable SMS receipt button switch to the right (Default = Disabled).
To have the system prompt to generate a gift receipt, toggle the Enable gift receipt button switch to the right (Default = Disabled).
RECEIPT LOGO AND SOCIAL MEDIA
Use this section to select a logo for your printed and digital receipts, and insert your business’ social media links onto your printed, emailed, and texted receipts.
In the RECEIPT LOGO AND SOCIAL MEDIA section on the right pane, tap Choose.
Select the source for your image:
To take a picture with the iPad’s camera:
Tap Camera.
Take the picture with the camera.
If you are satisfied with the image, tap Use Photo. If you are unsatisfied, tap Retake and repeat step ii.
Tap Logo size, and then tap the size you wish to use (from 10 - 100%).
Once your desired logo size is selected, tap <Back at the top of the right pane.
To use an image stored on the iPad’s internal memory:
Tap Library. The Photos popup appears.
Tap Camera Roll.
Browse the photos stored on your Apple iPad for your logo, and then tap it to select it.
Tap Logo size, and then tap the size you wish to use (from 10 - 100%).
Once your desired logo size is selected, tap <Back at the top of the right pane.
Tap inside the Web page link (email, SMS) field and enter your business' URL (website address)
Tap inside the Facebook link field and enter your corporate Facebook address (if applicable).
Tap inside the Twitter link field and enter your business’ Twitter handle (if applicable).
Tap inside the Instagram link field and enter your business' Instagram handle (if applicable).
NOTE: The Facebook address, Twitter handle, and /or Instagram link will print on printed copies. On receipts that are emailed or texted to customers, the links will be live hyperlinks which a customer can click to access your corporate Facebook page, Twitter page, and/or Instagram page.
NOTE: If you do not have a corporate Facebook, Twitter, or Instagram account, leave these fields blank.
Tap < Configuration at the top of the right pane to save your work and return to the main Configuration screen.