On the PAYD Administration main screen, click the Configuration icon ( ).
).
Use the Settings screen to configure the following store-wide merchant settings:
Inactivity Period (before locking or logging out the session)
Passwords
US Dollar Exchange Rate
Debit Cashback *(only available to integrated merchants using the iPP320 PINpad)
Debit Surcharge *(only available to integrated merchants using the iPP320 PINpad)
*These features may or may not be visible depending on your Merchant Agreement with Moneris® Solutions.
NOTE: Email notifications are sent to employees on the Moneris Solutions notification email list. For more help, see Viewing Employee Information.
On the PAYD Administration main screen, click the Configuration icon ().
The Configuration menu appears.
On the Configuration menu, click Settings.
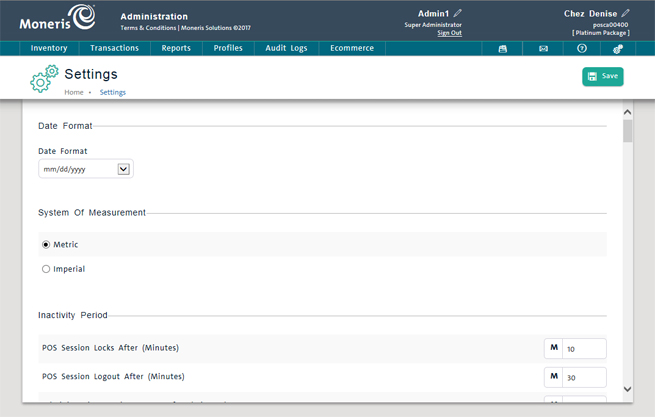
In the Settings screen, configure the settings as follows:
Under the Date Format section, click the Date Format drop-down menu and select the desired format. The date formats you can select include:
o (Default) mm/dd/yy
o mm/dd/yyyy
o dd/mm/yy
o dd/mm/yyyy
o yyyy/mm/dd
NOTE: This date format applies only to PAYD Pro Plus.
Under the System Of Measurement section, click either the Metric or Imperial radio button.
This setting will apply to height and weight measurements in the Inventory sections. Specifically it is used for entering product dimensions in a product's eCommerce tab for shipping purposes.
In the Inactivity Period section, enter the time period of user inactivity (minutes) before an PAYD Pro Plus In-Store POS view session locks in the POS Session Locks After textbox. The default is 120 minutes.
The user remains logged in but must re-enter his/her password.
NOTE: The time period before locking the POS session must be set to less than the POS session logout time period (see next step).
Enter the time period of user inactivity before the user is logged out of an PAYD Pro Plus In-Store POS view session in the POS Session Logout After textbox. The default is 240 minutes.
The user will need to log into PAYD Pro Plus In-Store POS view again.
Enter the time period of user inactivity before the user is logged out of a PAYD Administration session in the Administration Session Logout textbox. The default is 240 minutes.
The user will need to log into PAYD Administration again.
In the Passwords section, determine whether or not you want to set passwords to automatically expire:
● To enable passwords to automatically expire after a certain number of days, click the Auto expiry for passwords drop-down menu and select Yes. Proceed to step 2.
● To prevent passwords from expiring automatically after a certain number of days, click the Auto expiry for passwords drop-down menu and select No. Proceed to the next section (To configure Search settings).
Click inside the Number of days before expiry field and enter the quantity of days for which you want passwords to be valid e.g. if you want employees to create new passwords every other month, enter 60.
Click inside the Password must be different than this number of previous passwords field and enter a number of unique passwords to use. For example, if you use a new password in the month of August, and you have a value of 3 entered into this field, you will not be able to reuse August's password again until December.
NOTE: For more information on managing passwords in employee profiles, refer to Editing an Employee Profile.
The Search settings configure the appearance of PAYD Administration inventory, customer, order and employee profile search results.
In the Search Settings section, enter the number of search results you want displayed on each page in the Number Of Results Per Page textbox. The default is 20.
To display matching product information directly in the Product Details view when only one matching product is found, select Yes from the Show Product Detailed View Of Only 1 Result Is Returned drop-down list. The default is Yes.
NOTE: If you select No, the search result will be displayed in the Product Search Results screen. To view the product's details, you would need to click on the Product Name or Product ID.
In the Email Low Stock Notification section, click the radio button for the option you want to set based on the following guidelines:
Never - Never receive an email notification regardless of quantities in stock (default).
Daily - Receive an email notification at the end of the day identifying products with an inventory count that has reached or gone below the minimum quantity on that day.
After a sale - Receive an email notification at the end of a sale identifying the products with an inventory count that reached or went below the minimum quantity as a result of that sale.
In the Email field, enter an email address at which you wish to receive the notification.
NOTE: To enter multiple addresses, separate them with commas e.g. "[email protected], [email protected]").
NOTE: The notification is sent only once for each product (i.e., the notification is not re-sent if a product's inventory count drops further below the minimum quantity a subsequent time). Regardless of your email notification settings, products whose inventory count is at or below the minimum quantity are included in the Low Stock Report.
NOTE: For help on defining a minimum quantity for a product, see Adding a New Product and Editing the Default Product ID.
In the Purchase Orders section, enter email addresses in the provided address fields following these guidelines:
Purchase Orders Copy Email - Enter an address in this field that you wish to have BCC'd (blind carbon copied) on Purchase Orders that are sent to the supplier. It is a good idea to BCC the order to yourself so that you can have a record of a sent order, just in case you need to re-send an order. This field is optional.
Purchase Orders Reply-To Email - Enter an address in this field that the supplier may use to reply to when responding to a Purchase Order they received from your business. This address can be different than the general email address entered in the Configuration - Contacts screen. This field is optional.
NOTE: If you want suppliers to email your general inbox, leave this field blank. Any supplier replying to an emailed purchase order will have their email directed to the general email address entered in the Configuration - Contacts screen.
NOTE: To enter multiple addresses, separate them with commas e.g. "[email protected], [email protected]").
Under the Batch Close section, click the radio button for the option you want to set based on the following guidelines:
System Automated - Moneris automatically closes your batch for you every day between 10:00 p.m. and 11:00 p.m. EST.
NOTE: The Batch Close time period shown on the Settings screen reflects the merchant's home time zone.
Merchant Automated - The batch will be closed every day within a time-slot selected by you, the merchant using a 24-hour clock in EST.
See About Batch Close for more information.
Under the Open Cash Drawer section, click the radio button for the option you want to set based on the following guidelines:
o On Demand - Cash drawer opens on demand (Open Drawer button on the POS view Transactions button panel).
o For Any Sale - Cash drawer opens automatically after any sale regardless of tender.
o For Cash Sale - Cash drawer opens automatically after a cash sale only.
o For Cash Sale And On Demand - Cash drawer opens automatically after a cash sale and on demand.
o For Any Sale And On Demand - Cash drawer opens automatically after any sale and on demand.
NOTE: This setting is only applicable to merchants with a cash drawer installed and connected to a receipt printer.
In the Payment Types section, place checkmarks beside each payment method you will accept from customers. Leave boxes unchecked for payment methods you will not accept.
NOTE: For merchants using integrated payment processing with Moneris, please be sure to check only the boxes for payment types outlined in your Merchant Agreement with Moneris.
You can also create up to two custom payment methods. You can enter a name for the custom payment types, and they will appear as payment buttons on the Transactions buttons panel. These payment types can be used to pay for transactions, just like the other non-integrated payment types are used.
Click inside a Custom Payment Type field and enter a name for the payment type. Place a checkmark in the checkbox to its right.
If you want to allow change (paid out in Cash) to be given back to the customer using this payment type, click the Yes option beside Allow Change.
If your merchant account is integrated with the Moneris Gift & Loyalty program, and your store accepts Gift Cards as payment, you can configure some of their behaviour in this screen as well.
When activating a Moneris gift card, you can select whether or not to require payment for that gift card in order to activate it:
If you require a payment to activate a card, the system will not activate the card until it is paid for. If this is what you want to do, place a checkmark in the Payment Required When Activating From Gift Card Management Section checkbox. Follow these instructions when activating or reloading a gift card.
If you use gift cards as promotional items (e.g. you are giving the customer a gift card that will contain value but you are not collecting money from them in exchange for the it) leave the Payment Required When Activating From Gift Card Management Section checkbox unchecked. Follow these instructions when activating or reloading a gift card.
Now that the government has stopped minting and distributing pennies, use these settings to determine how you want to handle penny values on cash transactions (sales and refunds).
Under the Cash Penny Rounding section, click the radio button for the option you want to set based on the following guidelines:
No Rounding - Select this option if you do not want the system to perform any rounding when a customer is paying with cash. Selecting this option means the system will not perform any rounding and will still display the actual total due e.g. $12.98 instead of $13.00.
Nearest $0.05 Rounding - Select this option if you want the system to round to the nearest nickel value (ending in 5) e.g. an amount ending in 1 or 2 will round down to 0; an amount ending in 3 or 4 will round up to 5.
NOTE: Enabling Penny Rounding (by selecting any setting other than No Rounding) creates an extra Cash Penny Rounding column on the Sales report. This column shows the total cash (positive or negative) with the difference due to rounding.
Under the US Dollar Exchange Rate section, enter the exchange rate into the provided field e.g., $1 US = $1.10 CDN. This enables you to accept a foreign currency as cash payment at the point of sale.
NOTE: This value can be changed as frequently as you wish as exchange rates rise and fall.
The Payout Reasons entered here will appear as selectable options when processing a Payout in the POS view, or in the PAYD Pro Plus App.
In the Configuration - Settings screen, click the Edit button in the Payout Reasons section. A Payout reasons popup appears.
Enter an English reason. A French reason is optional.
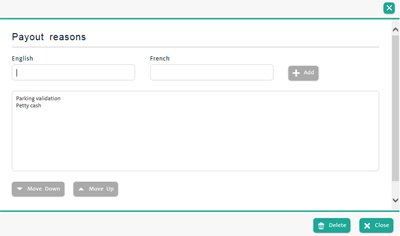
Click the Add button.
The reason will be added to the list.
Repeat steps 2 - 3 as necessary to add additional payout reasons.
Click the Close button in the bottom right corner of the screen to return to the Configuration - Settings screen.
You can also delete a payout reason that is no longer being used.
In the Configuration - Settings screen, click the Edit button in the Payout Reasons section. A Payout reasons popup appears.
Highlight a reason in the list on the right side of the popup.
Click the Delete button.
The reason will be removed from the list.
Repeat steps 2 - 3 as necessary to remove any additional payout reasons.
Click the Close button in the bottom right corner of the screen to return to the Configuration - Settings screen.
You can also change the order in which the payout reasons will be displayed in the Payouts screen at POS.
In the Configuration - Settings screen, click the Edit button in the Payout Reasons section. A Payout reasons popup appears.
Highlight a reason in the list on the right side of the popup.
Click the Move Up button to move the item up one place in the list. OR Click the Move Down button to move the item down one place in the list.
Repeat steps 2 and 3 until the items are listed in the desired order.
Click the Close button in the bottom right corner of the screen to return to the Configuration - Settings screen.
It is possible to define the button caption for the Quick Payout button. This payout button will appear in the Transactions Button Panel on the right side of the POS view. For more information, refer to the Using the Quick Payout topic.
NOTE: This will not impact the payout feature in the PAYD Pro Plus Mobile App.
If it is open, close the POS View before proceeding.
In the Payout Reasons section of the Configuration - Settings screen, click the Quick Payout Button Name drop-down menu and select a name from the list. NOTE: The list is populated with payout reasons entered in the Payout Reasons popup, as described above.
Click the Save button on the top of the screen.
Open the POS View again to confirm the payout reasons button has adopted your chosen caption.
You can select whether or not to add non-inventory products to inventory when they are being sold at the POS in the Non-Inventory Product section.
To automatically add Non-inventory products to inventory, select Yes from the Add Automatically To Inventory When Selling Them drop-down list. The default is Yes.
Under the Numberpad section, set the Use Numberpad In Checkout Screens to Yes.
Refer to Using the Numberpad for more information.
In the Service Required section, enter a quantity of days in the Days Before Service field.
To receive an email reminder a pre-set number of days before a product service date, select Yes from the Email Reminder drop-down list.
In the Email field, enter an email address at which you wish to receive the notification.
NOTE: To enter multiple addresses, separate them with commas e.g. "[email protected], [email protected]").
When sales are suspended at the POS, use this setting to define how long to keep them in system memory.
Under the Suspended Sales section, enter a value into the Number Of Days To Be Retained field.
NOTE: Once the days elapse on a suspended sale, it is removed from memory.
Under the Tipping section, select Yes from the Use Debit/Credit Tipping drop-down menu. The default is No.
NOTE: When processing a debit or credit card sales transaction, a tip amount option appears on the PINpad and the tip amount is shown on the Purchase Transaction popup in PAYD Pro Plus In-Store POS view.
NOTE: This feature is only available to merchants using integrated credit/debit payments with Moneris. If your PAYD Pro Plus In-Store Solution is not integrated with Moneris payment processing, this setting will not be visible.
Under the Debit Cashback section, select Yes from the Use Debit Cashback drop-down menu. The default is No.
Enter a maximum amount of cash (in dollars and cents) you want to allow customers to take into the Maximum Cashback Amount field. The field will accept a maximum of five digits.
NOTE: Leave the Maximum Cashback amount field empty, or enter "0.00" for a $100 limit. For more information on Debit Cashback, see Cashback on Debit Transactions.
NOTE: This feature is only available to merchants using an iPP320 PIN Pad for integrated credit/debit payments with Moneris. If your PAYD Pro Plus In-Store Solution is not integrated with Moneris payment processing, this setting will not be visible. The Cashback feature is not available for other PINpads.
Under the Debit Surcharge section, select Yes from the Use Debit Transaction Surcharge drop-down menu. The default is No.
Enter the amount (in dollars and cents) into the Surcharge Amount field.
Set the transaction amount range to which a surcharge is applicable. Enter the minimum amount in the left-most Surcharge Transaction Amount Range, and enter the maximum amount into the right-most field. For example, if you want to apply a surcharge to any debit transaction between $0.50 and $5.00, you would enter 0.50 in the left (minimum) field and 5.00 in the right (maximum) field.
NOTE: Leave both fields blank, or enter "0.00" into both fields for no limit. For more information on debit surcharge, see Surcharge on Debit Transactions.
NOTE: This feature is only available to merchants using an iPP320 PIN Pad for integrated credit/debit payments with Moneris. If your PAYD Pro Plus In-Store Solution is not integrated with Moneris payment processing, this setting will not be visible. The Surcharge feature is not available for other PINpads.
Under the Commission section, select Yes from the Use Commission drop-down list to enable sales commissions. The default is No.
Select the Assignment On Each Sale option you want from the drop-down list based on the following guidelines:
No - The employee performing the sales transaction is automatically assigned the commission. A different employee can be selected for the commission in the Purchase Transaction popup window.
Yes - For each sale, the employee performing the transaction is prompted to assign an employee to receive the commission.
To apply commissions to non-inventory item sales, select Yes from the Count Non-Inventory items drop-down list. The default is No.
NOTE: For PAYD Pro Plus to process commissions on sales, you must also set the commission rate for each employee entitled to receive commissions. For more help, see Adding a New Employee Profile and Editing an Employee Profile.
NOTE: All Inventory products are subject to a commission when Use Commission is set to Yes unless you remove commissions for specific products.
TIP: To remove commissions for a specific product, search for the item and then click the Details tab in the product profile. For more help, see Entering Additional Product Information.
Under the Store Credits section, set a default time limit until your customers' store credits expire:
● enter the limit in days in the Optional Time Limit (days) field (the default is blank, i.e., no limit).
NOTE: You can override the default store credit expiry date using PAYD Pro Plus In-Store POS view when issuing new store credit to a customer or when processing a store credit refund. For more information, refer to Issuing New Store Credit to a Customer or Viewing and Editing Store Credit Details.
Under the Layaways section, click the Use Layaways drop-down menu and select Yes. The default is No.
To configure an optional time period for full payment of layaways, enter the period in days in the Optional Layaway Period (days) field (the default is 0). If a time period is set, layaways will have an expiry date.
The Sales Quotes feature enables retailers (like furniture stores) to generate a quote for a customer from the POS view. The quote will feature pricing, a product image (if an image is assigned to the product profile) and a space for notes. This quote can also be automatically emailed to the customer as a reminder. For more information, refer to Generating Sales Quotes.
Under the Sales Quotes section, click the Use Sales Quotes drop-down menu and select Yes.
Set a default quotation expiry time frame in days in the Expire After field e.g. if you want quotes to expire after 14 days, enter 14 into the field.
Enter the number of days you want to remind in the Email Reminder Before Expiration field.
Use the drop down menus to specify the time at which the eCommerce Batch will be closed. This will close the batch for any transactions processed through the eCommerce website. NOTE: If you do not have the eCommerce module, this setting will not be visible.
Use this setting to determine whether or not your business accepts Gift Card as a payment method at the POS.
To accept Gift Card as a payment method at the POS, select Yes from the Allow gift card as a payment method drop-down list.
● Click the Save button at the top of the screen.