Use the Employees screen to add a new employee profile to PAYD Pro PlusTM. Start by creating the new profile and entering employee general information, then set up the employee's password management information (Employee ID, password, etc.). If you are adding a new employee profile from the PAYD Pro Plus Multi Location Solution, you can also assign the PAYD Pro Plus stores the employee can access in a multi-store environment.
On the PAYD Administration main screen, click Profiles.
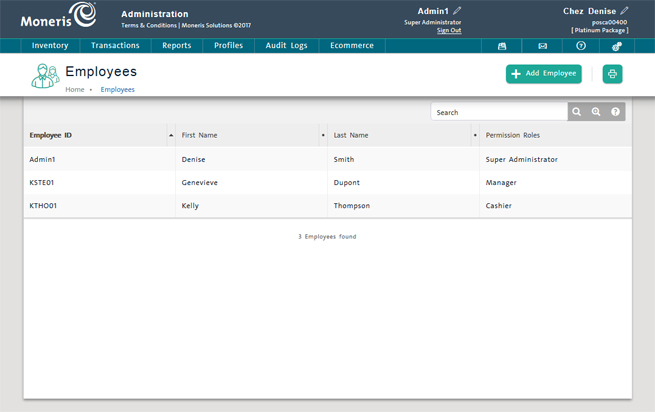
On the Profiles menu, under the Employees section, click Search.
The Employees screen displays a list of all employees defined in PAYD Pro Plus.
On the PAYD Administration main screen, click Profiles.
On the Profiles menu, under the Employees section, click Add Employee.
A blank General Info tab appears.
![]()
NOTE: The Login History tab is disabled since no login history exists yet.
Enter general information.
Complete the fields as follows (required fields are highlighted yellow):
First Name - Enter the employee's first name (required).
Last Name - Enter the employee's last name (required).
Status - The default is Active. Leave as is.
NOTE: Setting the status to Inactive prevents the employee from logging in to PAYD Pro Plus.
Role - From the drop-down list, select the permission role to which you want to assign the employee (required). An employee's role determines his/her ability to perform PAYD Pro Plus In-Store POS view and PAYD Administration functions.
Multi Location Role - From the drop-down list, select the Multi Location permission role to which you want to assign the employee (optional). This field only appears when you add or view an employee from PAYD Pro Plus Multi Location Administration . An employee's Multi Location role determines his/her ability to perform Multi Location Administration functions.
Under the Password Management section:
Employee ID - Enter the ID the employee will use to log in to PAYD Pro Plus and the PAYD Pro Plus Mobile app. Must have 6 to 12 alphanumeric characters and the first character must be an alpha character (e.g., JSMI001).
Temporary Password - Enter the password the employee will initially use to log into PAYD Pro Plus and the PAYD Pro Plus Mobile app. Passwords are case-sensitive and must have 8 to 12 characters. At lease one character must be a number, and the first character must be a letter (e.g., TestPwd1).
Confirm Temporary Password - Re-enter the password as above.
NOTE: After the new profile is saved, the password fields are left blank for security reasons.
NOTE: When a new user first logs in, he/she will be asked to enter a new password.
Under the Notification section:
Email - Enter the employee's email address (required).
Moneris System Notifications (Outages and Maintenance) - Check the box to indicate whether the employee is on the Moneris Solutions notification email list (e.g. notify this employee for upcoming planned maintenance or unexpected system outages).
Phone - Enter the employee's home phone number including area code. If applicable, enter an extension.
Mobile - Enter the employee's mobile phone number into this field.
Under the Address section:
Address 1& 2 - Enter the employee's street address.
City - Enter the employee's city of residence.
Country - From the drop-down list, select the employee's country of residence.
Province/State - From the drop-down list, select the employee's state or province. The list is populated based on the selected Country.
Postal/ZIP code - Enter the employee's postal or zip code.
Under the Limits section:
Refund Limit - Enter the maximum amount (in dollars) the employee is able to refund (required). To refund an amount above this limit, the employee will require an override by a user with appropriate permissions.
Discount Limit - Enter the maximum amount (in percentage) the employee is able to discount without an override. To discount an amount above this limit, the employee will require an override by a user with appropriate permissions. Leave the field blank for no limit.
Commission - Enter the percentage (%) of each sale an employee will receive as a commission. Entering a value enables sales commissions for the employee.
Under the Theme - POS section:
Set the contrast rate on the POS view. For employees that suffer from visual impairments, the Theme - POS drop-down menu enables merchants to set a high-contrast ratio on the POS view. When the employee logs in to the POS view, the contrast ratio of the view will be adjusted to make it easier to see. Default = normal view. Contrast = high-contrast view.
NOTE: When PAYD Pro Plus is configured to use commissions, all Inventory products are subject to a commission unless removed for specific products (see Entering Additional Product Information).
Click the Save button at the top of the screen.
The employee will be able to access PAYD Pro Plus functionality for the assigned stores based on his or her permission roles (see Entering General Information above).
NOTE: This functionality is only available to merchants using the PAYD Pro Plus Multi Location solution.
Logout of PAYD Pro Plus Administration.
Login to PAYD Pro Plus Multi Location.
On the Multi Location Administration main screen, click Profiles.
On the Profiles menu, under the Employees section, click Search.
Search for the employee profile. Once located, click on the employee's name in the list.
The employee's Details screen appears.
Click the Stores tab.
Select a store in the Available list and drag-and-drop it in the Assigned list.
TIP: To unassign a store, drag-and-drop it back to the Available list.

Repeat step 7 to assign the employee to other stores as needed.
Click the Save button at the top of the screen.