Use the Promotions screen to link products to a promotion that is defined in PAYD Pro PlusTM. By default, a promotion applies to all products in inventory. If you want a promotion to apply to certain products only, or if you want to apply specific promotional discounts to certain products, the next step after adding a promotion is to link the appropriate product categories, brand names, Product Names and Product IDs to the promotion and define any specific promotional discounts for these as needed following the steps in this topic: linking categories, linking brand names, linking Product Names and linking Product IDs.
NOTE: For more help, please see Promotions: Guidelines and Tips.
On the PAYD Administration main screen, click Inventory.
On the Inventory menu, under the Pricing heading, click Promotions.
The screen displays a list of promotions set up in PAYD Pro Plus.
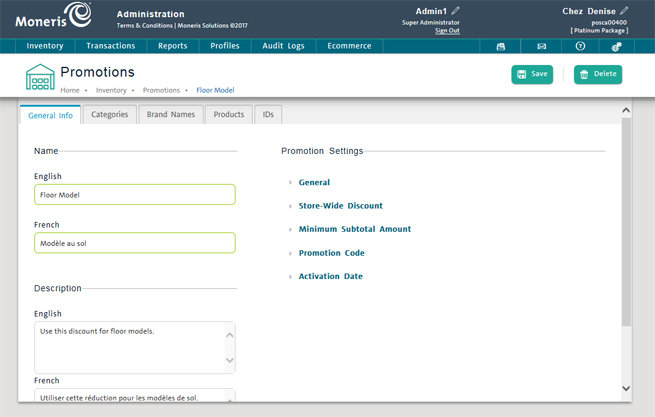
On the list, click the Promotion Name.
The promotion appears in the promotion details screen with the General Info tab selected.
Click the Categories tab.
The Categories tab appears empty.
Click the Add button.
The Assign Category popup appears with the category hierarchy tree visible.

On the category hierarchy tree, click the category you want to link to the promotion.
TIP: Use the triangular symbols ![]() to expand and collapse the tree as needed.
to expand and collapse the tree as needed.
Click the Assign Category button at the top of the screen.
A Definition of the discount popup appears.
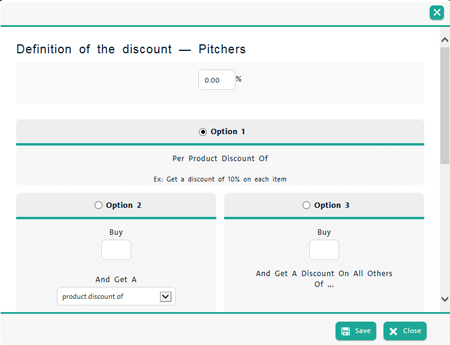
Enter a value in the % field at the top of the screen e.g. 10.00.
Click the desired radio buttons to complete the Per Product Discount Of section using the following guidelines:
Option 1 - Per Product Discount Of - This option sets up an overall discount for each product in the category that is added to a transaction. This option takes the percentage value entered in the top of the Definition popup.
Option 2 - Enter a quantity in the Buy field. Select product discount of to set the minimum quantity of a product that must be purchased to receive the discount on all quantities of that product sold OR transaction discount of to receive the discount on the overall transaction featuring those items.
EXAMPLE: Buy 12 to receive a discount of 10%. If a customer purchases 12 or more apples, the 10% discount applies to all the apples purchased. But the discount would not be applied if only 10 apples are purchased.
Option 3 - Enter a quantity in the Buy field to set the minimum quantity of a product that must be purchased to receive the discount on any additional quantities of that product sold.
EXAMPLE: Buy two to receive a discount of 10% on any additional purchased. If a customer purchases 10 apples, the discount applies to the third through tenth apples.
Option 4 - Enter a quantity in the top Buy field, then enter a quantity into the And Get field to set a quantity of a product that must be purchased to receive the discount on the next specified amount of that product sold.
EXAMPLE: Buy two to receive a discount of 10% on the next three items purchased. If a customer purchases 8 apples, the discount applies to the 3rd to 5th apples, but not the 6th to 8th.
Option 5 - Enter a quantity in the Buy field to set a quantity of any products that must be purchased to receive the discount on the selected product(s). To select products, click the These link and select products from the Apply discount on these products popup. Click Close to dismiss the popup.
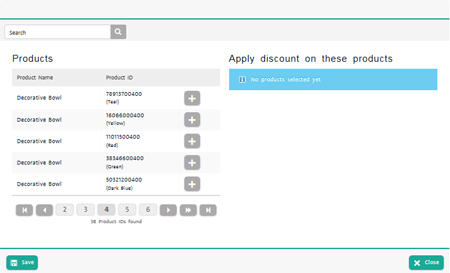
EXAMPLE: Buy two of any item and receive a discount of 50% on a coffee. If a customer purchases any to two items, he or she receives a half price coffee.
NOTE: To select products from the Apply discount on these products popup, in the Search textbox, enter Product Name or Product ID and click the Search icon ![]() . And then click the product's
. And then click the product's ![]() button from the search list. The selected products are listed at the top of the Apply discount on these products popup. Click the product's
button from the search list. The selected products are listed at the top of the Apply discount on these products popup. Click the product's ![]() button to remove it from the selected list.
button to remove it from the selected list.
Click the Save button.
The Definition of the Discount popup closes.
Click the Save button at the top of the Promotions screen to save your work.
Repeat steps 1 - 9 to link additional categories to the promotion as needed.
On the list, click the Promotion Name.
The promotion appears in the promotion details screen with the General Info tab selected.
Click the Categories tab.
Click the ![]() to the right of the category you wish to remove.
to the right of the category you wish to remove.
A confirmation popup appears.
Click the Ok button to confirm to removal.
On the promotion details screen, click the Brand Names tab.
The Brand Names tab appears empty.
Click the Add button.
A blank search popup appears.
Click inside the Search textbox at the top of the popup and enter all or part of the brand name.
Click the Search icon. ![]()
Results are listed below.
TIP: To list all brand names in your PAYD Pro Plus inventory, leave the textbox blank and click the Search icon.
Click the brand's Add icon ![]() on the right side of the popup.
on the right side of the popup.
A new Definition of the discount window appears.
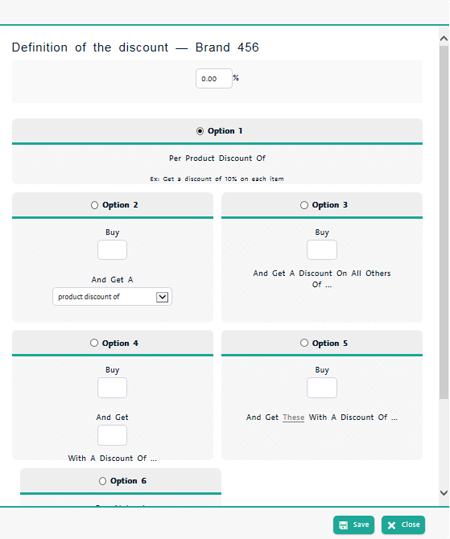
Enter a value in the % field at the top of the screen e.g. 10.00.
Click the desired radio buttons to complete the Per Product Discount Of section using the following guidelines:
Option 1 - Per Product Discount Of - This option sets up an overall discount for each product in the brand that is added to a transaction. This option takes the percentage value entered in the top of the Definition popup.
Option 2 - Enter a quantity in the Buy field. Select product discount of to set the minimum quantity of a product that must be purchased to receive the discount on all quantities of that product sold OR transaction discount of to receive the discount on the overall transaction featuring those items.
EXAMPLE: Buy 12 to receive a discount of 10%. If a customer purchases 12 or more apples, the 10% discount applies to all the apples purchased. But the discount would not be applied if only 10 apples are purchased.
Option 3 - Enter a quantity in the Buy field to set the minimum quantity of a product that must be purchased to receive the discount on any additional quantities of that product sold.
EXAMPLE: Buy two to receive a discount of 10% on any additional purchased. If a customer purchases 10 apples, the discount applies to the third through tenth apples.
Option 4 - Enter a quantity in the top Buy field, then enter a quantity into the And Get field to set a quantity of a product that must be purchased to receive the discount on the next specified amount of that product sold.
EXAMPLE: Buy two to receive a discount of 10% on the next three items purchased. If a customer purchases 8 apples, the discount applies to the 3rd to 5th apples, but not the 6th to 8th.
Option 5 - Enter a quantity in the Buy field to set a quantity of any products that must be purchased to receive the discount on the selected product(s). To select products, click the These link and select products from the Apply discount on these products popup. Click Close to dismiss the popup.
EXAMPLE: Buy two of any item and receive a discount of 50% on a coffee. If a customer purchases any to two items, he or she receives a half price coffee.
NOTE: To select products from the Apply discount on these products popup, in the Search textbox, enter Product Name or Product ID and click the Search icon ![]() . And then click the product's
. And then click the product's ![]() button from the search list. The selected products are listed at the top of the Apply discount on these products popup. Click the product's
button from the search list. The selected products are listed at the top of the Apply discount on these products popup. Click the product's ![]() button to remove it from the selected list.
button to remove it from the selected list.
Click the Save button.
The Definition of the Discount popup closes.
Click the Save button at the top of the Promotions screen to save your work.
Repeat steps 1 - 9 to link additional brands to the promotion as needed.
On the list, click the Promotion Name.
The promotion appears in the promotion details screen with the General Info tab selected.
Click the Brand Names tab.
Click the ![]() to the right of the brand name you wish to remove.
to the right of the brand name you wish to remove.
A confirmation popup appears.
Click the Ok button to confirm to removal.
On the promotion details screen, click the Products tab.
The Products tab appears empty.
Click the Add button.
A blank search popup appears.
Click inside the Search textbox at the top of the popup and enter the product ID or all or part of the product name.
Click the Search icon. ![]()
Results are listed below.
TIP: To list all Product Names in your PAYD Pro Plus inventory, leave the textbox blank and click the Search icon.
Click the product's Add icon ![]() on the right side of the popup.
on the right side of the popup.
A new Definition of the discount window appears.

Enter a value in the field at the top of the screen e.g. 10.00.
Select whether that value will be a dollar discount or a percentage discount by selecting the appropriate radio button option (e.g. the $ radio button for dollars, the % radio button for percentages).
Click the desired radio buttons to complete the Per Product Discount Of section using the following guidelines:
Option 1 - Per Product Discount Of - This option sets up an overall discount for each of the specific products that are added to a transaction. This option takes the dollar or percentage value entered in the top of the Definition popup.
Option 2 - Enter a quantity in the Buy field. Select product discount of to set the minimum quantity of a product that must be purchased to receive the discount on all quantities of that product sold OR transaction discount of to receive the discount on the overall transaction featuring those items.
EXAMPLE: Buy 12 to receive a discount of 10%. If a customer purchases 12 or more apples, the 10% discount applies to all the apples purchased. But the discount would not be applied if only 10 apples are purchased.
Option 3 - Enter a quantity in the Buy field to set the minimum quantity of a product that must be purchased to receive the discount on any additional quantities of that product sold.
EXAMPLE: Buy two to receive a discount of 10% on any additional purchased. If a customer purchases 10 apples, the discount applies to the third through tenth apples.
Option 4 - Enter a quantity in the top Buy field, then enter a quantity into the And Get field to set a quantity of a product that must be purchased to receive the discount on the next specified amount of that product sold.
EXAMPLE: Buy two to receive a discount of 10% on the next three items purchased. If a customer purchases 8 apples, the discount applies to the 3rd to 5th apples, but not the 6th to 8th.
Option 5 - Enter a quantity in the Buy field to set a quantity of any products that must be purchased to receive the discount on the selected product(s). To select products, click the These link and select products from the Apply discount on these products popup. Click Close to dismiss the popup.
EXAMPLE: Buy two of any item and receive a discount of 50% on a coffee. If a customer purchases any to two items, he or she receives a half price coffee.
NOTE: To select products from the Apply discount on these products popup, in the Search textbox, enter Product Name or Product ID and click the Search icon ![]() . And then click the product's
. And then click the product's ![]() button from the search list. The selected products are listed at the top of the Apply discount on these products popup. Click the product's
button from the search list. The selected products are listed at the top of the Apply discount on these products popup. Click the product's ![]() button to remove it from the selected list.
button to remove it from the selected list.
Click the Save button.
The Definition of the Discount popup closes.
Click the Save button at the top of the Promotions screen to save your work.
Repeat steps 1 - 10 to link additional products to the promotion as needed.
On the list, click the Promotion Name.
The promotion appears in the promotion details screen with the General Info tab selected.
Click the Products tab.
Click the ![]() to the right of the category you wish to remove.
to the right of the category you wish to remove.
A confirmation popup appears.
Click the Ok button to confirm the removal.
On the promotion details screen, click the IDs tab.
The IDs tab appears empty.
Click the Add button.
A blank search popup appears.
Click inside the Search textbox at the top of the popup and enter the product ID or all or part of the product name.
Click the Search icon. ![]()
Results are listed below.
TIP: To list all product IDs in your PAYD Pro Plus inventory, leave the textbox blank and click the Search icon.
Click the product ID's Add icon ![]() on the right side of the popup.
on the right side of the popup.
A new Definition of the discount window appears.
Enter a value in the field at the top of the screen e.g. 10.00.
Select whether that value will be a dollar discount or a percentage discount by selecting the appropriate radio button option (e.g. the $ radio button for dollars, the % radio button for percentages).
Click the desired radio buttons to complete the Per Product Discount Of section using the following guidelines:
Option 1 - Per Product Discount Of - This option sets up an overall discount for each of the specific product IDs that are added to a transaction. This option takes the dollar or percentage value entered in the top of the Definition popup.
Option 2 - Enter a quantity in the Buy field. Select product discount of to set the minimum quantity of a product that must be purchased to receive the discount on all quantities of that product sold OR transaction discount of to receive the discount on the overall transaction featuring those items.
EXAMPLE: Buy 12 to receive a discount of 10%. If a customer purchases 12 or more apples, the 10% discount applies to all the apples purchased. But the discount would not be applied if only 10 apples are purchased.
Option 3 - Enter a quantity in the Buy field to set the minimum quantity of a product that must be purchased to receive the discount on any additional quantities of that product sold.
EXAMPLE: Buy two to receive a discount of 10% on any additional purchased. If a customer purchases 10 apples, the discount applies to the third through tenth apples.
Option 4 - Enter a quantity in the top Buy field, then enter a quantity into the And Get field to set a quantity of a product that must be purchased to receive the discount on the next specified amount of that product sold.
EXAMPLE: Buy two to receive a discount of 10% on the next three items purchased. If a customer purchases 8 apples, the discount applies to the 3rd to 5th apples, but not the 6th to 8th.
Option 5 - Enter a quantity in the Buy field to set a quantity of any products that must be purchased to receive the discount on the selected product(s). To select products, click the These link and select products from the Apply discount on these products popup. Click Close to dismiss the popup.
EXAMPLE: Buy two of any item and receive a discount of 50% on a coffee. If a customer purchases any to two items, he or she receives a half price coffee.
NOTE: To select products from the Apply discount on these products popup, in the Search textbox, enter Product Name or Product ID and click the Search icon ![]() . And then click the product's
. And then click the product's ![]() button from the search list. The selected products are listed at the top of the Apply discount on these products popup. Click the product's
button from the search list. The selected products are listed at the top of the Apply discount on these products popup. Click the product's ![]() button to remove it from the selected list.
button to remove it from the selected list.
Click the Save button.
The Definition of the Discount popup closes.
Click the Save button at the top of the Promotions screen to save your work.
Repeat steps 1 - 10 to link additional product IDs to the promotion as needed.
On the list, click the Promotion Name.
The promotion appears in the Promotion Details view with the General Info tab selected.
Click the IDs tab.
Click the ![]() to the right of the ID you wish to remove.
to the right of the ID you wish to remove.
A confirmation popup appears.
Click the Ok button to confirm the removal.
Promotions: Guidelines and Tips