Use the Promotions screen to add a new promotion to your PAYD Pro PlusTM Solution. Start by creating the new promotion's record and entering general information following the steps in this topic.
By default, a promotion applies to all products in inventory. If you want a promotion to apply to certain products only, or if you want to apply specific promotional discounts to certain products, the next step after adding a new promotion is to link the appropriate product categories, brand names, Product Names and Product IDs (see Linking Products to Promotions).
NOTE: Promotions created in the PAYD Pro Plus In-Store Solution can be used in the PAYD Pro Plus Mobile app. See Applying Discounts for more information.
On the PAYD Administration main screen, click Inventory.
On the Inventory menu, under the Pricing heading, click Promotions.
The view displays a list of promotions set up in your PAYD Pro Plus solution.
At the top of the screen, click the + New Promotion button.
The Promotions screen appears with a blank General Info tab. The Categories, Brand Names, Products and IDs tabs are disabled until you save the new promotion.
![]()
In the Name section, enter English and French named in the textboxes (required).
Enter a short description of the promotion in the Description textboxes (optional).
Under the Promotion Settings section on the right side of the screen, click the General drop-down menu to expose general settings.
From the Available In drop-down menu, select where the promotion is available based on the following guidelines:
o POS and Ecommerce - Select this option to have the promotion available to both online and in-store customers.
o Ecommerce only - Select this option to have the promotion available only to online customers making purchases through your eCommerce website.
o POS only - Select this option to have the promotion available only to in-store customers making purchases in the physical store location.
o Display As A Main Tab On Website - Select Yes if you wish to have this promotion appear as a main tab on your eCommerce website. Select No if you only want the promotion to appear during checkout.
NOTE: This option is only visible to merchants with the PAYD Pro Plus eCommerce module. If you do not have eCommerce, this drop-down will not be visible to you.
Select whether you want to apply pricing groups to the promotion:
o To apply pricing groups to the promotion, leave the Do Not Apply Pricing Groups To This Promotion checkbox unchecked.
o To not apply pricing groups, place a checkmark in the Do Not Apply Pricing Groups To This Promotion checkbox.
Click the Store-Wide Discount drop-down menu to expose store-wide discount settings.
Enter a percentage in the percentage field in the middle of the screen. For example, if you would like to enter a 10% store-wide discount, enter 10.00 in the percentage field. For more information about changing the settings in this drop-down, refer to Setting Store-Wide Discount Options below.
Click the Minimum Subtotal Amount drop-down menu and enter the minimum subtotal amount in the provided field.
NOTE: Minimum subtotal refers to the minimum subtotal of a transaction to which the promotion will be available. For example, if you enter $10.00 as the Minimum Subtotal Amount, and a customer's purchase comes to $5.75, you will not be able to use this promotion on that transaction because the subtotal falls below the minimum defined here. Leave the field blank if no subtotal is required to activate the promotion.
Click the Promotion Code drop-down menu and enter a promotion code in the provided field.
NOTE: Leave this field blank if the promotion is to automatically be applied to all POS and eCommerce transactions. Only enter a code for the promotion if you are going to manually apply the promotion at the POS.
Click the Activation Date drop-down menu and enter a start and end date in the Activation Date and Expiration Date fields respectively. When you click inside the fields, a calendar popup appears. You can use the calendar to select a date, or manually enter a date in MM/DD/YYYY format.
o If you want to limit the promotion's availability to specific days of the week, click the Days Of The Week drop-down menu and uncheck all the days on which the promotion will not be offered. A check in the box means the promotion will be available on that day; no checkmark means the promotion is not offered on that day. By default a promotion is available every day unless this setting is changed.
o If you want to limit the promotion's availability to specific times of the day, click the Time Range drop-down menu and uncheck the All Day checkbox. In the From and To fields that appear, enter in a time range in which the promotion will be available. By default a promotion is available all day unless this setting is changed.
EXAMPLE: If you want a "Super Saturdays" promotion to offer a discount only on Saturdays between noon and 2pm available only during the summer, you would set the Activation Date to run from the beginning of July through the end of August, set the Days Of The Week to Saturdays only (by unchecking all other days) and setting the Time Range between 12:00 PM and 2:00PM.
Click the Save button on top of the screen.
To link categories, brand names, Product Names or Product IDs to the new promotion, go to Linking Products to Promotions.
Store-wide discount options offer you a wide variety of tools to customize the promotion to help you meet your sales objectives. When you click the Store-Wide Discounts drop-down menu, a portion of the screen appears. Enter a percentage in the percentage field in the middle of the screen. For example, if you would like to enter a 10% store-wide discount, enter 10.00 in the percentage field. To configure more advanced promotion settings, click the Other Options button at the bottom of the view to expand the view. Refer to To configure other store-wide discount types below for more information.
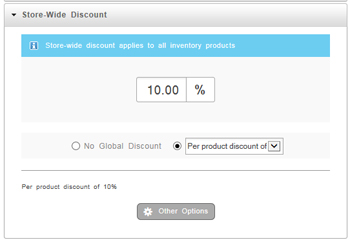
In the Store-wide discount section of the General Info tab, click the radio button for the option you want to set based on the following guidelines:
o No Global Discount - To have a promotion apply only to the linked categories, brand names, Product Names or Product IDs, click the No Global Discount radio button and then define the specific promotional discounts for these as needed (see Linking Products to Promotions and Promotions: Guidelines and Tips).
o Per product discount of... - To apply a store-wide discount to all inventory products, click the Per product discount of radio button.
o Transaction discount of... - This is the other option in the Per product discount of drop-down menu. Select this option to apply the discount to an overall transaction instead of the individual line items on the transaction.
Other Options - When you click the Other options link, a popup window appears offering radio buttons for four additional store-wide discount types.
These store-wide discounts require you to specify conditions to activate the promotion. The discounts apply to all inventory products.
In the Store-Wide Discount section, on the General Info tab of the Promotion Details view, click the Other Options button.
The view expends, offering radio buttons for five additional store-wide discount types.
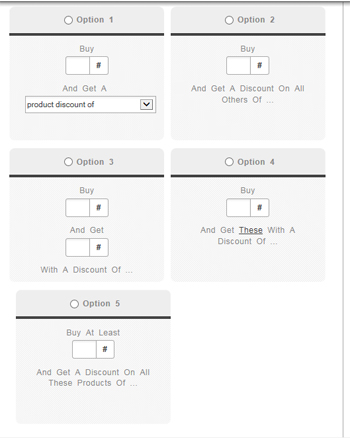
Click the radio button for the option you want to set based on the following guidelines:
NOTE: The percent discount applied in each of the discounts listed below is the value entered in the percentage (%) field located in the Store-Wide Discount section above.
Option 1 - Enter a quantity in the Buy field. Select product discount of to set the minimum quantity of a product that must be purchased to receive the discount on all quantities of that product sold OR transaction discount of to receive the discount on the overall transaction featuring those items.
EXAMPLE: Buy 12 to receive a discount of 10%. If a customer purchases 12 or more apples, the 10% discount applies to all the apples purchased. But the discount would not be applied if only 10 apples are purchased.
Option 2 - Enter a quantity in the Buy field to set the minimum quantity of a product that must be purchased to receive the discount on any additional quantities of that product sold.
EXAMPLE: Buy two to receive a discount of 10% on any additional purchased. If a customer purchases 10 apples, the discount applies to the third through tenth apples.
Option 3 - Enter a quantity in the top Buy field, then enter a quantity into the And Get field to set a quantity of a product that must be purchased to receive the discount on the next specified amount of that product sold.
EXAMPLE: Buy two to receive a discount of 10% on the next three items purchased. If a customer purchases 8 apples, the discount applies to the 3rd to 5th apples, but not the 6th to 8th.
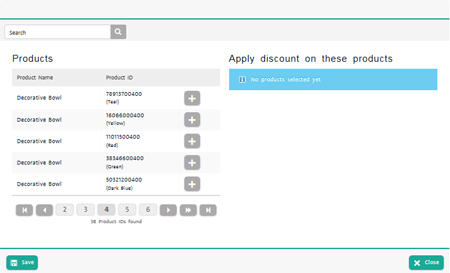
Option 4 - Enter a quantity in the Buy field to set a quantity of any products that must be purchased to receive the discount on the selected product(s). To select products, click the These link and select products from the Apply discount on these products popup. Click the ![]() beside the items you wish to add. Click Save to save, then click Close to dismiss the popup.
beside the items you wish to add. Click Save to save, then click Close to dismiss the popup.
EXAMPLE: Buy two of any item and receive a discount of 50% on a coffee. If a customer purchases any to two items, he or she receives a half price coffee.
NOTE: To select products from the Apply discount on these products popup, in the Search textbox, enter Product Name or Product ID and click the Search icon ![]() . And then click the product's
. And then click the product's ![]() button from the search list. The selected products are listed at the top of the Apply discount on these products popup. Click the product's
button from the search list. The selected products are listed at the top of the Apply discount on these products popup. Click the product's ![]() button to remove it from the selected list.
button to remove it from the selected list.
Option 5 - Enter a quantity into the Buy At Least field to set a quantity of products that must be purchased to receive a discount on all other products of that type.
EXAMPLE: Buy at least two action figures and receive all action figures at 10% off.
On the Inventory menu, click Promotions.
Applying a Discount to a Product (In-Store)
Applying a Discount to a Sale (In-Store)
Applying Discounts (Mobile)