On the POS view, click the Select Customer button on top of the screen.
OR
Click the Customer Search button (![]() ) on the Transactions buttons panel.
) on the Transactions buttons panel.
You can view and update details of a customer in your the PAYD Pro PlusTM customer database through the Customer Details popup. Access the popup by searching for the customer from the POS view.
Once you display a customer record in the Customer Details popup, you can:
You can also assign the customer to the current sale and delete the customer from the database.
On the POS view, click the Select Customer button on top of the screen.
OR
Click the Customer Search button (![]() ) on the Transactions buttons panel.
) on the Transactions buttons panel.
The Customer Search screen appears.
To search for the customer, in the Search textbox, enter Customer ID, name or phone number and click the Search button (![]() ).
).
A list of matching customers appears below.
On the search results list, click the customer.
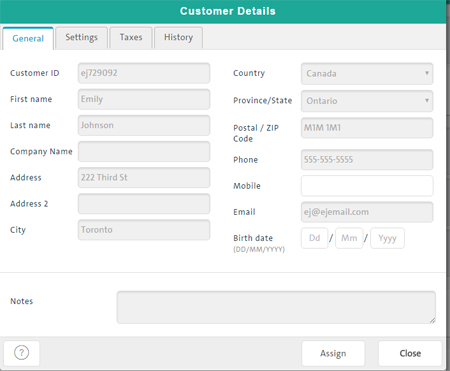
Customer details appear in the Customer Details popup with the General tab selected.
Go to Updating Customer General Information below.
At the bottom of the popup, click the Assign button.
The Assign button is replaced with an Unassign button.
At the bottom of the popup, click the Delete button.
A confirmation popup appears.
Click Yes to delete the customer.
OR
Click No to cancel the operation and return to the Customer Details popup.
In the Customer Details General tab, edit fields as necessary following the guidelines below (required fields are highlighted yellow):
Customer ID - ID used by PAYD Pro Plus to identify the customer.
First name - Customer's first name (required).
Last name - Customer's last name (required).
Company Name - If the customer's billing address is a company address, the company's name.
Address & Address 2 - Customer's mailing address.
City - Customer's city of residence.
Country - Customer's country of residence.
Province/State - Customer's province or state of residence (populated based on selected Country).
Postal/ZIP code - Customer's postal or zip code.
Phone - Customer's primary phone number (required).
Mobile - Enter the customer's mobile phone number.
Email - Customer's email address. This email address can be used to receive mass emails from your business.
Birth date - Enter the customer's birth date in DD/MM/YYYY format.
Notes - Use this field to add any notes about the customer.
To save changes, at the bottom of the popup, click the Save button.
In the Customer Details popup, click the Settings tab.

On the Settings tab, click the Add button beside Store Credit.
The New Store Credit popup appears.
Enter a note about the store credit into the Notes field (1000 characters max).
To set a store credit expiration date, click the Choose button.
The Calendar popup appears.
NOTE: If you do not select an expiration date (i.e., leave the Expiration Date field set to Default), the expiration time limit set in your PAYD Administration is used (refer to Configuring Other Merchant Settings). If no default is set in PAYD Administration, then the store credit will not expire.
Select the date on which the store credit will expire.
Enter the dollar amount of the store credit in the Amount issued field.
Click the Save button.
NOTE: For more information adding new store credit, see Issuing New Store Credit to a Customer and Viewing and Editing Store Credit Details.
In the Customer Details screen, on the General tab, click inside the Notes field and enter/edit notes about the customer (1000 characters max).
To save changes, at the bottom of the popup, click the Save button.
In the Customer Details popup, click the Taxes tab.
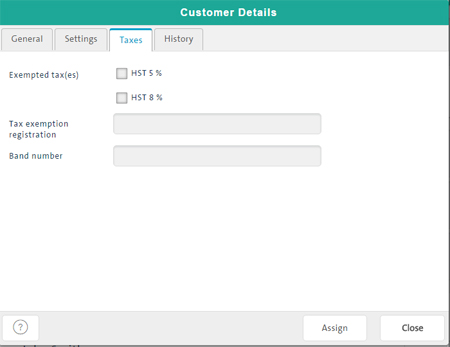
Select/deselect the Exempted tax(es) checkbox(es) as appropriate. A check mark in the box means the customer will be exempted from paying the selected tax type on all sales.
If the customer has tax-exempt status, in the Tax exemption registration textbox, enter the tax exemption registration number/ID on the tax exemption identity card provided by the customer.
If the customer has native status, in the Band number textbox, enter the band or registry number on the Certificate of Indian Status identity card provided by the customer.
To save changes, at the bottom of the popup, click the Save button.
In the Customer Details popup, click the History tab.
Click the Sales tab.
The tab displays a summarized history of the customer's sales transactions, if any.
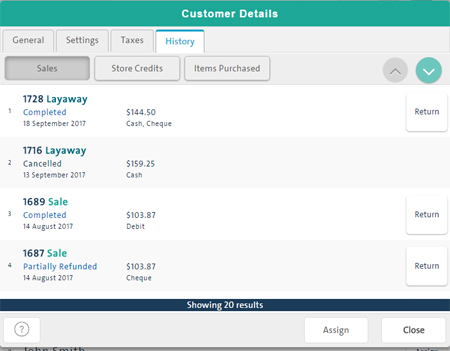
On the sale list, click the sale whose details you want to see.
Details of the sale appear in the Sale Details popup.
For more help, see Viewing Transaction Details.
On the sale list, click the Return button beside the sale.
The Select Product(s) for Return or Exchange screen appears listing the products of the sale.
Select the item(s) to be returned. For detailed help, see Selecting a Return Item From a List.
NOTE: For more help, see Transacting a Return: Quickview.
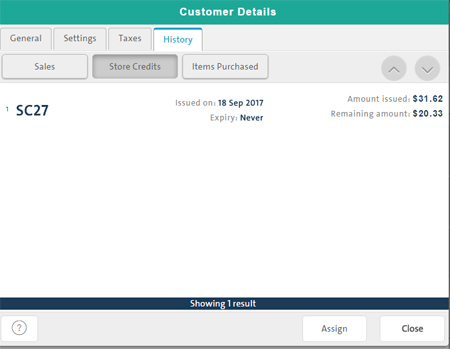
In the Customer Details popup, click the History tab.
Click the Store Credits tab.
The tab displays a list of the customer's store credits, if any.
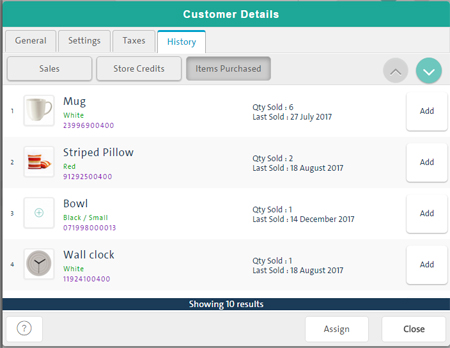
In the Customer Details popup, click the History tab.
Click the Items Purchased tab.
The tab displays information about the items purchased by the customer (if any) including Product Name, Product ID, Attributes, Quantity and Last Sold (date the customer last purchased the item).
On the items purchased list, click the product.
For more help, see Viewing Product Details.
On the items purchased list, click the product's Add button.
NOTE: Adding a product to the current sale from the customer's items purchased list assigns the customer to the sale even if the sale was previously assigned to another customer.
For more help, see Adding a Product to a Sale (Through Inventory Search).