Processing a Split Tender Payment
Process a split tender payment (i.e., two payment types) through the Transactions button panel on the POS view. Any combination of two payment types can be used to process a split tender payment, including two debit cards and two credit cards. Split tender payments are processed differently depending on whether you are an integrated or a non-integrated merchant.
NOTE: Before checking out from a sale, you can apply a discount to it.
If PAYD Pro PlusTM is integrated with the Moneris® payment processing solution, you will be processing integrated split tender payments.
To process an integrated split tender payment:
-
Process the transaction: assign a customer (optional), add products to the bill, adjust quantities or prices, apply discounts (if applicable).
-
On the POS view Transactions button panel, click Split Tender.
-
If the assigned customer has outstanding store credit, a popup prompt appears asking if you would like to use it as the payment method. Do one of the following:
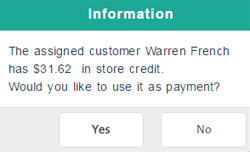
-
If your store is set to prompt for the commission employee, the Employee search popup appears. Select an employee by clicking the Assign button beside the employee on the list.
The Split Tender Purchase Transaction popup appears.
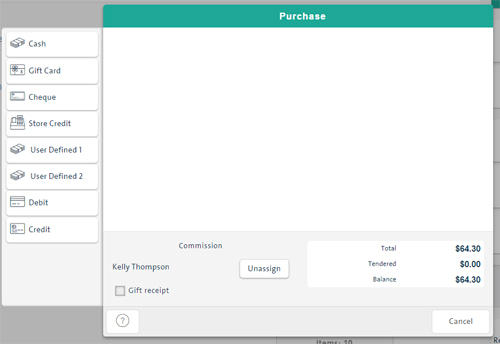
-
If you want to print a gift receipt, select the Gift receipt checkbox.
-
Select the payment method for the first transaction by clicking the appropriate tender type button on the left e.g. Cash.
-
In the Amount textbox, enter the amount of the first tender type.
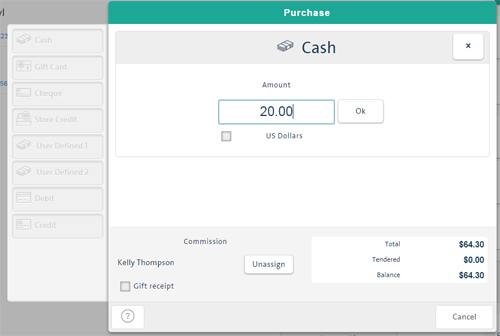
-
Do one of the following:
TIP: To cancel your tender type selection before processing, click the  button.
-
Wait for approval.
While the transaction is being processed, tender type buttons are disabled. Once the transaction is approved, the buttons are re-enabled.
-
Do one of the following:
-
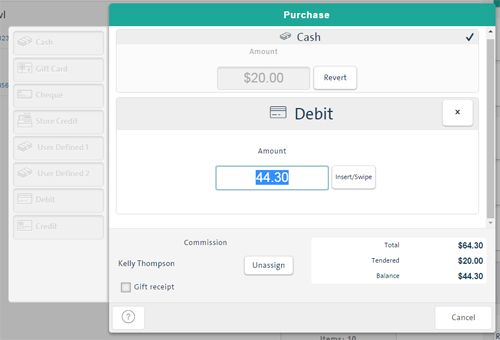
If the transaction is accepted, proceed with the second transaction as below.
-
If the transaction fails or is declined (debit or credit only): 1) re-attempt with the same tender type or select a different type and re-process as above, OR 2) cancel the split tender payment altogether by clicking the Cancel button at the bottom of the popup.
NOTE: You cannot proceed with the second transaction until the first one is approved.
-
If the transaction is non-debit/credit and is accepted but you want to change the amount, click the Revert button and enter a new amount. If you want to cancel the transaction, click the button and re-process as above.
-
If the transaction is debit or credit and is accepted but you want to cancel it, you will need to void it. Click the Void button next to the Amount textbox and process the void as prompted. Once void details are displayed, click Cancel to close the popup.
NOTE: Voiding the first transaction cancels the split tender payment altogether. You can then restart the payment as above or, if needed, cancel the entire sale.
-
Select the payment method for the second transaction, process as above and wait for approval.
-
Do one of the following:
-
If the transaction is approved, the sale is completed and the popup closes automatically. Proceed with the next sale. If you want to reverse the completed sale, you will need to process a split tender void.
-
If the transaction is debit or credit and is declined or otherwise fails, re-attempt the transaction OR cancel it and void or cancel the first transaction in order to cancel the entire split tender sale.
NOTE: If you terminate the sale by clicking the Cancel button before the second transaction is processed and approved, you will be prompted with a confirmation message. If the first transaction was debit or credit, you should click No to return to the popup and re-attempt the second transaction OR cancel it and void the first transaction in order to cancel the entire split tender sale. If you click Yes, the first transaction will go through, you will be returned to the POS view and the sale will be processed as an Incomplete sale. You can then re-initiate the sale but will need to void the terminated sale's first transaction following the normal single tender void procedure. This will also be the case if the connection to the server is lost or the application is closed before the second transaction is processed.
-
If you selected the Gift receipt checkbox, the Select Gift Receipt's Items popup appears. Select the items to appear on the gift receipt and click Print. For detailed help, see Printing Gift Receipts.
To print a gift receipt:
If your PAYD Pro Plus In-Store Solution is not integrated with Moneris payment processing, you will need to first process any of the two transactions that are debit or credit separately on your non-integrated terminal. Once approval is obtained and you have an Auth ID, you can process both transactions on PAYD Pro Plus In-Store POS view. To process the transactions, follow the same steps for an integrated payment above, referring to the non-integrated instructions for each applicable payment method.
Related Topics:
The POS View
Applying a Discount to a Sale
Cancelling a Sale or Refund
Selecting Employees for Commission
Voiding a Sale: Quickview