Processing a Credit Card Payment
Process a credit card payment through the Transactions button panel on the POS view. Other checkout options are cash, debit, gift card, cheque, split tender and store credit. Credit card payments are processed differently depending on whether you are an integrated or a non-integrated merchant.
PAYD Pro PlusTM also supports processing payments on an invoice and putting items on layaway. For details, see Invoicing Sales and Putting Items on Layaway.
NOTE: Before checking out from a sale, you can apply a discount to it.
If your PAYD Pro Plus In-Store Solution is integrated with Moneris® payment processing, you will be processing integrated credit card payments.
NOTE: Card type is determined by the processing response received by PAYD Pro Plus. If you select a credit card payment, but a debit card is used, the transaction is processed as a debit transaction and recorded as such on receipts and reports.
To process an integrated credit card payment:
-
Process the transaction: assign a customer (optional), add products to the bill, adjust quantities or prices, apply discounts (if applicable).
-
On the POS view Transactions button panel, click Credit.
-
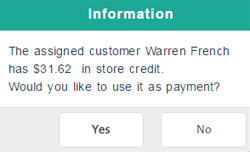
If the assigned customer has outstanding store credit, a popup prompt appears asking if you would like to use it as the payment method. Do one of the following:
-
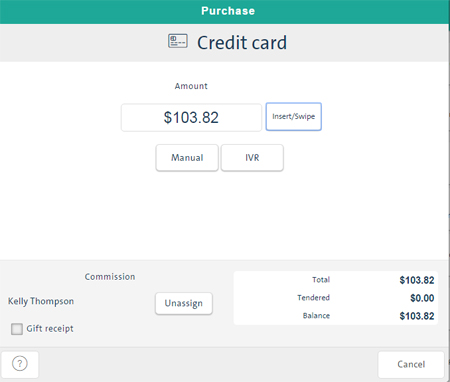
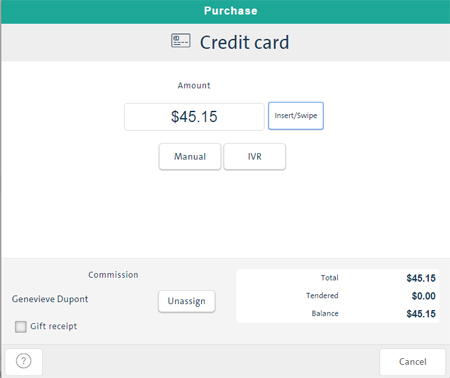
If your store is set to prompt for the commission employee, the Employee search popup appears. Select an employee by clicking their name in the list.
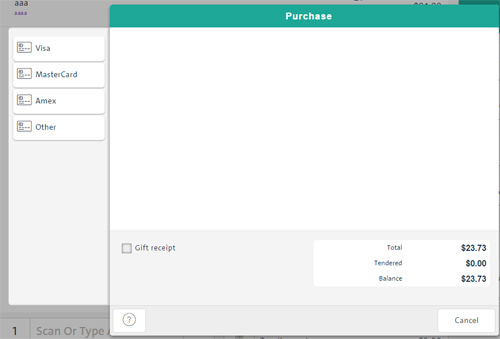
The Credit Card Purchase popup appears.
-
If you want to print a gift receipt, select the Gift receipt checkbox.
-
Click the Swipe or Insert/Swipe button.
NOTE: If you need to process the payment as a Card Present IVR transaction, see the next procedure (If you cannot connect to the host for processing or if the issuer requests a Call for Authorization).
-
Do one of the following:
-
-
If the PINpad is chip-enabled and the card is a chip card, insert the card in the chip card reader, OR
-
Swipe the card on the PINpad's magnetic stripe reader. OR
-
Tap the contactless credit card on the PINpad's embedded contactless reader (the contactless reader is embedded behind the PINpad's display screen).
NOTE: See Card Entry Methods for more information on how to enter cards on the PINpad.
-
Follow the prompts on the PINpad. Refer to Merchant and Customer Prompts on an Integrated PINpad for more information. If you experience problems, click the button again and swipe/re-swipe the card.
-
If still unsuccessful, click the Manual button, manually enter the credit card number and expiry date, and click OK.
NOTE: If using an iPP320 PINpad, the PINpad accepts user input directly. Therefore, use the PINpad to manually key in the credit card number and expiry date, then press the green OK key.
-
Complete the transaction as prompted. Refer to Merchant and Customer Prompts on an Integrated PINpad for more information.
NOTE: Your system may behave differently depending on how receipt options were configured.
-
If you selected the Gift receipt checkbox, the Select Gift Receipt's Items popup appears. Select the items to appear on the gift receipt and click Print. For detailed help, see Printing Gift Receipts.
To print a gift receipt:
If you cannot connect to the host for processing or if the issuer requests a Call for Authorization:
If you cannot connect to the payment processing host or if the transaction is returned with a Call for Auth or Refer to Issuer response, you will need to call the Authorization IVR system and process the transaction as a Card Present IVR transaction.
NOTE: Card Present IVR transactions are stored temporarily as Pending transactions until they are force posted once a connection to the host can be re-established. Any pending transactions are noted on the status bar at the top of the POS view.
-
Call the Authorization IVR system and obtain an Authorization ID.
-
On the POS view Transactions button panel, click Credit.
-
If the assigned customer has outstanding store credit, a popup prompt appears asking if you would like to use it as the payment method. Do one of the following:
-
If your store is set to prompt for the commission employee, the Employee search popup appears. Select an employee by clicking their name in the list.
The Credit Card Purchase popup appears.
-
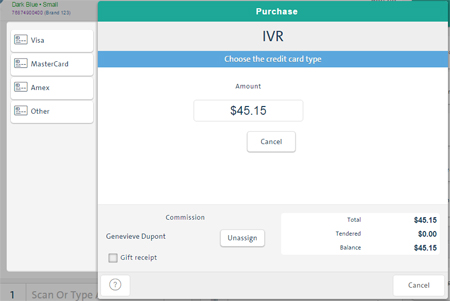
On the Credit Purchase Transaction popup, click the IVR button.
-
Click the appropriate credit card type button: Visa, MasterCard, Amex, Other.
-
Enter the credit card number, the card's expiry date month and year, and the Authorization ID (in the Auth ID field) obtained via IVR.
-
Click OK.
-
When you are able to re-establish a connection with the payment processing host, post the pending transaction.
If the credit card transaction is declined or otherwise fails:
If the credit card transaction is declined, a Declined message appears on the Credit Card Purchase Transaction popup and a Declined receipt prints.
-
Attempt to process the transaction again in case of input error.
-
If unsuccessful, click the Cancel button at the bottom of the popup to cancel the transaction.
-
Do one of the following:
-
Process the transaction again with a different card or payment type, OR
-
At the bottom of the POS view, click the Reset button ( ) to cancel the sale and reset the view to its default settings.
NOTE: If you successfully complete the sale, it is assigned a Completed status and the declined or failed transaction is saved as part of the sale's transaction information. If you choose to re-set the Cash Register, the sale is terminated but is saved on your system as a Cancelled sale. (See Viewing Transaction Details.)
If your PAYD Pro Plus In-Store Solution is not integrated with the Moneris payment processing solution, you will need to process credit card transactions separately on your non-integrated terminal in addition to processing them on PAYD Pro Plus.
To process a non-integrated credit card payment:
-
Process the transaction: assign a customer (optional), add products to the bill, adjust quantities or prices, apply discounts (if applicable).
-
Process the payment on your credit terminal as you would normally, making a note of the Auth ID.
-
On the POS view Transactions button panel, click Credit.
-
If the assigned customer has outstanding store credit, a popup prompt appears asking if you would like to use it as the payment method. Do one of the following:
-
If your store is set to prompt for the commission employee, the Employee search popup appears. Select an employee by clicking their name in the list.
The Credit Card Purchase Transaction popup appears.
-
If you want to print a gift receipt, select the Gift receipt checkbox.
-
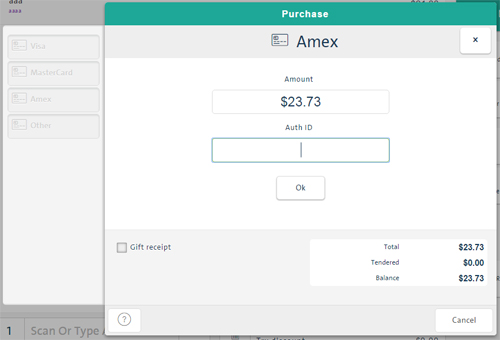
Click the button for the tendered card type: Visa, MC, Amex, Other.
TIP: To change the card type, click the X button and repeat step 6.
-
Enter the Auth ID and click OK.
NOTE: Your system may behave differently depending on how receipt options were configured.
-
If you selected the Gift receipt checkbox, the Select Gift Receipt's Items popup appears. Select the items to appear on the gift receipt and click Print. For detailed help, see Printing Gift Receipts.
To print a gift receipt:
If the credit card transaction is declined:
-
Attempt to process the transaction on the non-integrated terminal again in case of input error.
-
If unsuccessful, click the Cancel button at the bottom of the popup to cancel the transaction.
-
Do one of the following:
-
Process the transaction again with a different card or payment type, OR
-
On the POS view header, click the Reset button to cancel the sale and reset the view to its default settings.
Related Topics:
The POS View
Card Entry Methods
Processing a Cash Payment
Processing a Debit Payment
Processing a Gift Card Payment
Processing a Cheque Payment
Processing a Split Tender Payment
Processing a Store Credit Payment
Selecting Employees for Commission
Tipping on Integrated Payments
Merchant and Customer Prompts on an Integrated PINpad
Applying a Discount to a Sale
Posting Pending Transactions
Configuring Merchant Receipt Options